This journal documents my experiences with a Canon 50D, my first DSLR camera, purchased on Oct. 16, 2008. It is a showcase for my photography, includes comments about the camera's usability, with suggestions for improvement and discusses photography-related topics.
Portfolio: Thomas Rusch
photographer
Thu Apr 02 13:26:42 2009
Much of Thomas Rusch's
photography includes post-processing, but one can't deny the
original talent.
You can easily spend an hour looking through his portfolio and be
amazed, or you can spend an hour looking at a single photograph and
continue to be amazed.

RAW Photography
photos
Sat Apr 04 10:54:37 2009
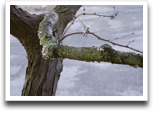
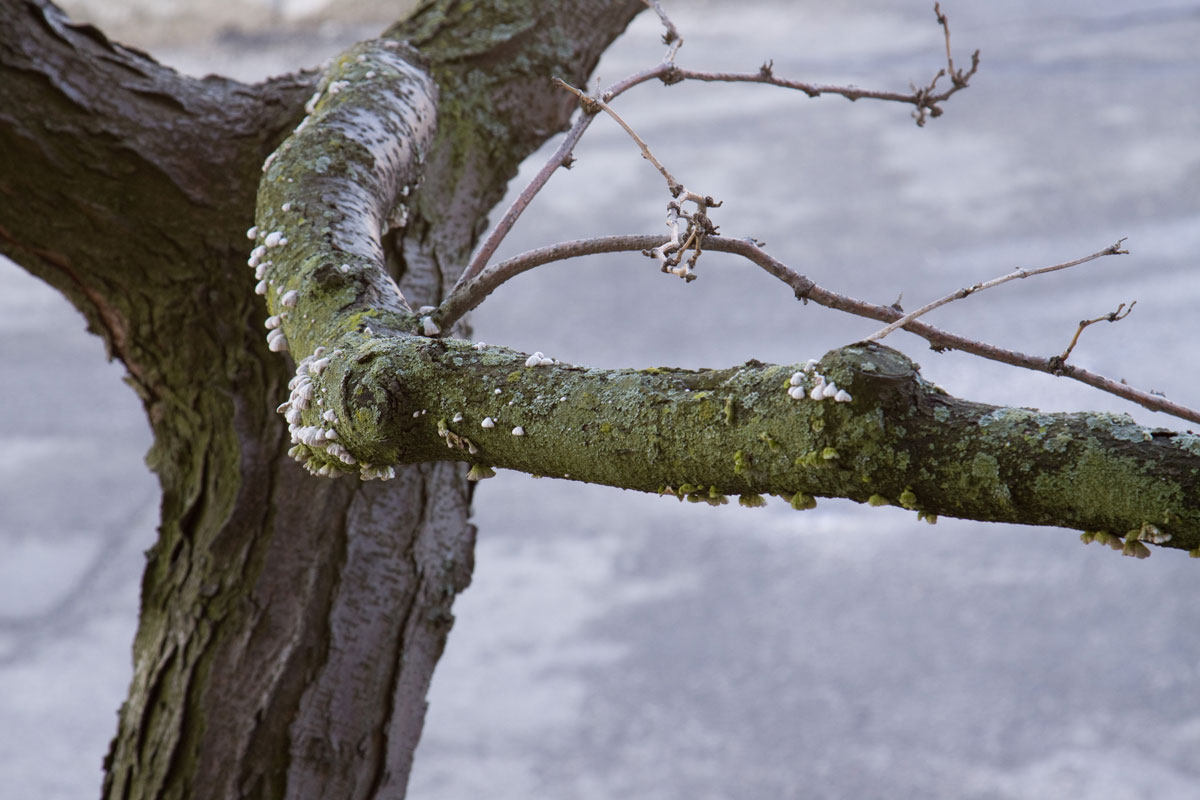
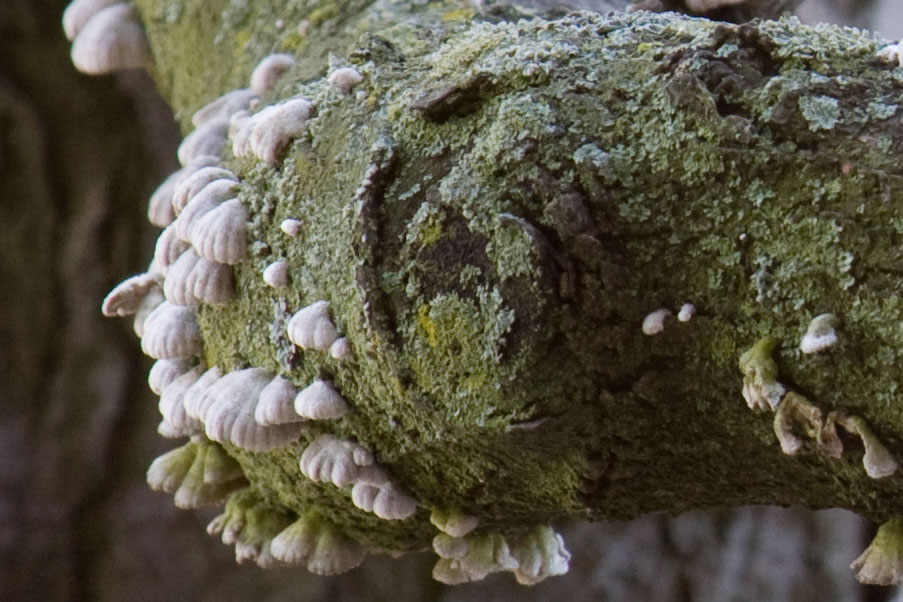
I did very little photography last week, due to the inclement weather that April inevitably brings. During a lull in the rain, I stepped out onto the balcony and photographed a nearby tree (about 15 feet away) in RAW. After looking at "muddy" JPEGs, the quality of a RAW photograph is astonishing. The pictures below cannot begin to illustrate the detail I see on the screen.
 |
 |
Tree branch, RAW converted to JPEG. Aperture
Priority, 24-105L @105, f/8, 1/30s, ISO200, AWB [1 of 4] |
100% crop at the area of focus. |
Tips for shooting RAW: the camera must be stabilized with a tripod (I used the balcony railing) or you might as well use JPEG; you have to use 10x Live View magnifier to precisely micro-adjust the focus, otherwise be prepared for a disappointing pixel-peeping session.
Update Sat Apr 04 22:07:07 2009 David writes:
> Tips for shooting RAW
You change the file format to raw and start shooting.
The issue you were having was something unrelated to file formats:
> 24-105L @105, f/8, 1/30s,
The reason why you had blurry pictures is because your shutter speed was 1/30, but your focal length was 105. The rule of thumb is: speed = 1 / f.length.
So if you're shooting at 1/30, you need to be at ~30mm. If you want to be at 105mm, you need to be at about 1/125s. (Of course with a non-full frame, you have to use the 1.6 multiplier, so 30mm ~ 50mm = 1/60s.)
Using a tripod (or other support) will fix things as you've noticed, but if you're in a situation where you need to do things 'free-hand', that's the rule of thumb.
Eric also mentioned that he couldn't see any difference between a RAW file and a JPEG file. Perhaps it's my imagination that I notice a difference and I only noticed it here because I took so much care in setting up.
One of the other photos was taken at a higher shutter speed but with a correspondingly higher ISO (it was an overcast day) which I thought was unacceptably noisy when pixel peeping.
Update Sun Apr 05 14:49:55 2009: I should note that I
deleted the Canon DPP software once I patched Photoshop Elements 4
to add RAW support.
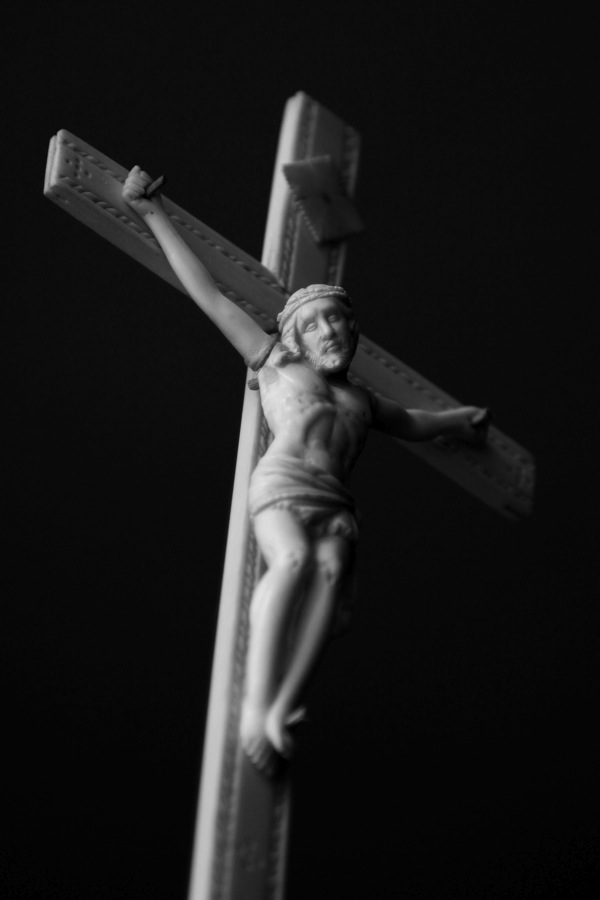
Crucifixus
photo
Sun Apr 05 18:19:57 2009
Crucifixus etiam pro nobis.
There is a crufix,about 12 inches tall, on my table. The Christ figure is at eye-level when I sit down. Two weeks ago, I decided to photograph this crucifix.
Naturally, all the ten photographs, though taken from different angles and fields of view, were all taken at eye-level; the way I was used to seeing the crucifix. After the session, looking over the photographs on my computer, I wasn't able to decide which of the five photographs I kept, to display. There was nothing compelling about one or all of them— they were all technically great, used the rule of thirds, etc. but there was something missing. I didn't know what it was. So I just let it be.
Sometime during the following week, I don't remember the exact moment, but I think I was in bed reading In the Garden of Iden (one of the free Tor books, which I stopped reading with 100 pages remaining, because it just got tedious) I realized what the problem was— in all the photographs I had taken so far, the crucifix looked liked a crucifix; it didn't look like the crucifixion— which is what I was subconciously trying to depict.
So yesterday, I re-photographed the crucifix from a low angle, imagining what a spectator at the crucifixion would have witnessed.
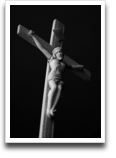 |
Aperture Priority, 24-105L @105, f/4, 1/200s, ISO 400, AWB. Converted to Grayscale and levels adjusted boosting the blacks. [1 of 20] |
Of the 10 photographs, it took me a day to decide on one of them. It was a close choice between two photographs from slightly different angles. I tested my final choice in grayscale, as I always do, and it was obvious that it looked better.
I'm still not happy with the final choice. I can tell from the thumbnail if a photograph works, and this one does not. Perhaps it's the composition.
Photograph vs. Snapshot
philosophy
Mon Apr 06 21:55:11 2009
The best answer I found, so far, to the question, "What is the
difference between a photograph and a snapshot?", is in a
discussion
about snapshots and candid photographs in the dpchallenge.com
forums:
The difference between a snapshot and a photograph is [that] a snapshot maybe the most important image you ever make; it will remind you of people you know, places you've been, good times, bad times; but a photograph somehow communicates that to someone else.
Like the other commenters, I originally thought that lighting, or composition, or the time it took to setup the photograph, or how long the photographer waited at the same spot to take the photograph, would affect whether the result was considered just a snapshot or a true photograph. After reading the definition, I realized that it didn't matter that Adams spent all that time in the darkroom working on the negative or that Bresson waited for hours to capture the decisive moment.
None of those things matter when you look at the blurry photographs taken moments after the assassination of Benazir Bhutto (I think it was a feature on The Big Picture) as the photographer blindly aims the camera and keeps the shutter release pressed as the crowd surges madly in all directions. He was at the right place at exactly the right time and his photographs conveyed the emotion of the moment perfectly.
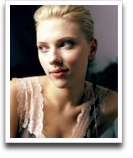
Scarlett
photos
Tue Apr 07 07:01:53 2009
Different photographers, same person— Scarlett Johansson as imagined by Sean Cook, Annie Leibovitz, Todd Plitt, Louis Vuitton, etc.
I think I prefer the unreal, unimaginably beautiful Scarlett (Sean Cook); the Louis Vuitton Scarlett is a complete stranger.
The Host with the Most
statistics
Tue Apr 07 21:35:42 2009
If you had asked me which site had the biggest collection of
images, I would have guessed Flickr.
In fact, Imageshack currently holds the record for hosting the
largest number of pictures, but will lose that title to Facebook by
year's end. 850 million photos a month are being uploaded to
Facebook which has 15B pictures, and it will overtake Imageshack,
which currently has 20B pictures.
TechCruch has the full survey.
Rituals
philosophy
Wed Apr 08 00:05:41 2009
This is the ritual I perform before I begin photographing and
after I finish photographing:
- Take the camera out of the bag and put the neck-strap around the neck. (When you accidently lose the grip of the camera, because you're wearing winter gloves, you'll be thankful you had the neck-strap).
- Take the lens-cap off and put it in the bag, logo-side up. (One day after completing a shoot, I put the camera back in the bag (which had been configured for stowing the camera lens-down) and zipped it up. A few minutes, later I walked by the dining room table and noticed THE LENS-CAP IS ON THE TABLE! AAAAAHHH! So, by putting the lens-cap back in the bag face-up, 1) you prevent dust from falling into the cap and 2) you remember to put it on the lens before you store the camera in the bag. Logo-up also means you can see the lens-cap in the near-darkness as the "Canon" shines. Aside: I have already dropped the lens-cap once and it has a bruise).
- Close the camera bag and ensure the velcro patches make contact and engage the center clasp. ( The 50mm lens, the lens-cap and the charger are rolling around in the bag. You don't want the bag accidently opening and spilling its contents as you're maneuvering for a shot.)
- Switch on the camera and hold it in the proper orientation, as recommended in the manual, so the sensor cleaner can do its thing. (It is assumed the camera has a storage card that is not full and a charged battery is installed).
- Decide, in your mind, what the camera settings should be, by evaluating the scene you are preparing to shoot.
- Press the joystick to bring up the Quick Control menu on the rear LCD and check settings based on previous step. Check that the mode is correct: Av, Tv, M, P, etc.; check that the ISO is correct; check that White Balance is correct; check that Exposure is correct; check that the Metering is correct and check that the focus point is correct. Also check that IS is on/off and AF is on/off, as required. (I did an entire shoot with IS off once, because I blindly went to shut-off the AF and accidently shut-off IS). You are now ready to photograph.
- When photography is complete, shut off the camera. (A few times, I have found that I had stowed the camera back into the bag while it was still on, but that it had gone to sleep. My worry is that the camera will wake-up in the bag when the shutter button is accidently pressed as it gets jostled.)
- Before stowing the camera, undo the clasp of the camera-bag, remove the lens-cap from the bottom of the bag and place it on the lens.
- Ensure the camera is off before placing it in the camera-bag.
- Zip up the bag, and engage all three clasps. (If the
camera is in the bag, it MUST be fully zipped and the center clasp
must be engaged— you don't want to lift the bag by the top
handle without the clasp being engaged. Update Sat May 02
08:45:37 2009: engage all three clasps only if the camera is
"ready-to-go", meaning, battery is charged and CF card is inserted;
otherwise only the front clasp is engaged when either the battery is
being charged and/or the CF card is in my laptop.)
Rocco Morabito, R.I.P.
photographer
Wed Apr 08 12:07:17 2009
Rocco Morabito, winner of the 1968 Pulitzer Prize for photography,
"The Kiss of Life", passed away aged 88 on April 5th.
Canon Digital Learning Center
technique
Wed Apr 08 18:59:59 2009
The Canon Digital Learning Center (DLC) showcases Canon products
and the photographers who use them for photographers of all skill levels.
I am currently going through the
Tips
and Techniques section.
Low-light Shoot Tomorrow
technique
Wed Apr 08 21:33:38 2009
I have been asked to photograph an open house taking place in our building, tomorrow; the lighting conditions range from poor to terrible. The photography involves candid shots of the participants and their projects/posters. I was debating between using the 50/1.4 and the 24-105/4L.
I came across an article on low-light concert photography which convinced me to go with the 50/1.4 for the candids and then switch to the 24-105 for a few "ambience", wide shots where noise doesn't matter as much.
The second part of the article has good suggestions on metering. I wrote a note to myself to remember to use spot metering.
Update Thu Apr 09 17:36:12 2009: An hour before the Open House, I took some test shots with the 50mm lens and found that at f/2.8 I needed ISO 800 to get a shutter speed over 1/50s. In the end, I ended up going with the 24-105 at f/4 using ISO 1600 when I realized that I couldn't step far enough back to get both the subject and their poster in the shot. Since the lighting varied greatly from table to table, I had to keep tweaking the metering (between Evaluative and Spot) for nearly every photograph. Having an IS lens was a tremendous benefit.
I shot 202 photographs (not including the tests) over 2.5 hours, totalling close to 1GB. The 202 photos were culled to 128 totalling 600MB, cut to a DVD and given to the organizer. All the photos were in "L" resolution (15.1MP) though I shot a few pans in lower resolution "S" (8MP) with the intent of stitching them into a panorama. I also had to shoot in burst mode a few times to capture an energetically moving subject.
Thu Apr 09 20:50:16 2009: Walking home from the train station I realized a couple of things:
- if I had remembered how to do it, I would have stored the preferred camera settings into the "C1" custom settings holder, before switching lenses, instead of writing them down onto a Postit notepad I carried with me.
- the nearly 50% attrition rate (202 photos culled to 128) was due to my
having shot every subject twice, with the second photograph being
exposed correctly.
Instead of the focus-and-recompose techinque, a few of the photos
were taken after selecting the focus point using the
focus-point-selector button (top-right of camera rear) and then
spinning the top-wheel to select my focus point while looking
through the viewfinder. I need a ritual for the focus-and-recompose
technique because I sometimes forget to lock the exposure on the
subject.
This shoot was a fantastic learning experience.
Thu Apr 09 23:55:21 2009: I have
the thumbnails
up if anyone feels like peeking. In hindsight, I should have set
the camera to do exposure bracketing which would have saved some
time which I spent re-shooting the same shot with a different
exposure.
Lessons learned and noted for the next Open House, which is on April 30th.
Unsharp Mask
technique
Fri Apr 10 21:21:06 2009
There is nothing worse than a sharp image of a fuzzy concept.
—Ansel Adams
At the end of the Open House, I requested that all the paricipants stand together on a thirty foot long stairway so I could take a group shot from the base. Getting them all posed and standing still was described like herding cats so I knew I wouldn't have much time to shoot. I shot at f11 in Aperture Priority dues to the depth involved and at 1600 ISO, I had a shutter speed of 1/8s. It didn't occur for me to try a shot f/8. Noted for future reference.
 |
Aperture Priority, 24-105L @24, f/11, 1/8s,
ISO 1600, AWB, Landscape. Corrected for skintone, shadows lightened. [1 of 6] |
Shooting handheld at 1/8s does not produce the sharpest photographs so I have to resort to using the Unsharp Mask filter in Photoshop to tweak the sharpness. There are three variables in the dialog box and I always have to consult the online documentation because I keep forgetting the recommended settings:
Amount determines how much to increase the contrast of pixels. For high-resolution printed images, an amount between 150% and 200% is usually best.
Radius specifies the number of pixels to sharpen around edges. For high-resolution images, a radius between 1 and 2 is usually recommended. A lower value sharpens only the edge pixels, whereas a higher value sharpens a wider band of pixels. This effect is much less noticeable in print than on-screen, because a 2-pixel radius represents a smaller area in a high-resolution printed image.
Threshold determines how far different pixels must be from the surrounding area before they are considered edge pixels and sharpened. To avoid introducing noise (in images with flesh tones, for example), experiment with Threshold values between 2 and 20. The default Threshold value (0) sharpens all pixels in the image.
Fri Apr 10 23:09:17 2009: Given a choice between a poorly exposed, but sharp photograph and a well exposed but slightly blurry photograph, I would choose the latter because it's easier to sharpen than to fix underexposed shadows and overexposed hilights.
My next purchase will likely be a monopod and/or a tripod.
I have also realized the utility of Adjustment Layers in Photoshop in my attempts to improve the group photograph, above. An Adjustment Layer allows one to replay edits (adjust for skin tone; lighten shadows; auto smart-fix; etc.) in various orders to see if one way works better than the other and to save them for future reference.
Mon Apr 27 09:31:24 2009: See
also local contrast enhancement settings for unsharp mask.
Kodak Publications
theory
Sun Apr 12 08:43:23 2009
I found a link to Kodak's educational publications website from a
study-guide
for the photography textbook, Photography by London, Stone
& Upton.
Post-processing
technique
Mon Apr 13 22:49:16 2009
You don't take a photograph, you make it.
—Ansel Adams
As I had requested, the organizer provided me with a list of photos he chose for the album (when I gave him the DVD on Thursday, I said that the photos should be colour-corrected before publishing.)
From the 128 photos I provided, he chose 52, of which he noted 25 were "the best of the bunch". He wasn't sure how long the conversion process would take, so he thoughtfully made a distinction between the two types. Aside: It looks like my keep/discard ratio is now 12% (25 of 202); let's say 1 in 10.
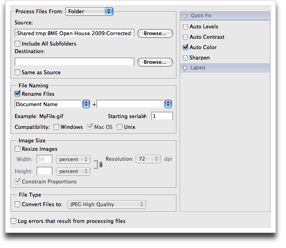
First, I saved the list of numbers into a file files.txt then I made a copy of the selected images into a separate folder (called corrected/) because Photoshop Element's batch-processing (Process Multiple Files... menu item ) dialog can process a given folder:
for i in $(cat files.txt)
    cp IMG_${i}.JPG corrected
Inside corrected/, I created a subfolder called out/ where the corrected files, output by Elements, would be stored. The batch-processing dialog has provisions for adding numbers, dates etc. to rename the processed files, but I wanted to keep the same names and not overwrite the originals (for reasons which will soon become obvious).
I selected Auto Color Correct as the batch action to perform and I requested that the output file resolution be reduced by 50% (hoping to reduce any sensor noise by down-sampling). However, I noticed that the quality of the final files was considerably worse (noticeable JPEG artifacts in the shadows) because Elements was saving the JPEG at a lower quality (a 4MB JPEG was being saved as a corrected 500k image). So I canceled the processing of the remaining files and re-started the processing without the down-sampling. It took 15 minutes to process the 52 files on my Core Duo Mac Mini running Photoshop Elements (emulated under Rosetta). There was an option to save the final JPEG at a specific (resolution) quality, but I didn't use that option.
I had to manually adjust four images for skin tone after the auto-correction, because those particular images had two different kinds of lights— people lit by tungsten and flourescent in the background.
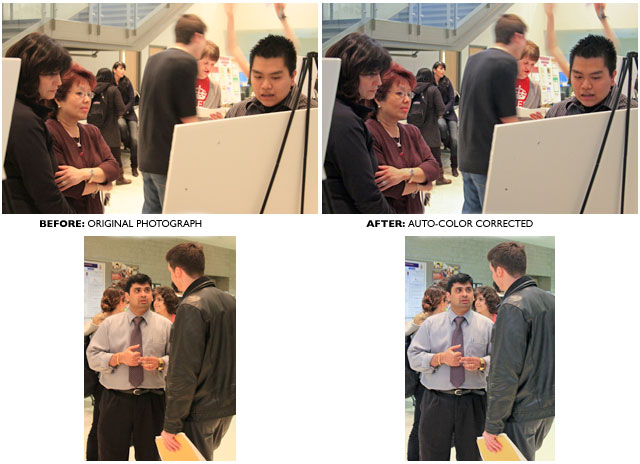 |
A contact sheet showing the differences between a pair of photographs— the original is on the left (24-105L@35mm, f/4, 1/15s, ISO 1600, Center Weighted Average, AWB) and the Auto Color-corrected image on the right. |
Update Tue Apr 14 17:31:44 2009: David pointed that my 1 in 10 keep/discard ratio is in fact Sturgeons Revelation, which states that, "Ninety percent of everything is crap."
Things As They Are (Not)
philosophy
Tue Apr 14 12:01:33 2009
The camera and lens play an important, but relatively trivial role in capturing reality; the captured image is a fleeting glimpse of the light captured at the moment the shutter being released and the sensor being exposed. The photographer, however, plays the most significant role in capturing the image. Ultimately, though, it is the viewer who is the pivotal element between the photographer and the photograph.
The challenge for me has first been to see things as they are, whether a portrait, a city street, or a bouncing ball. In a word, I have tried to be objective. —Berenice Abbott
There is no argument that a photograph is an inaccurate representation of a moment in time of a certain reality. A photograph is not completely objective in its representation of reality (and not because the earliest photographs were in black and white, or an approximation, thereof). It is because the photographer chooses what to ultimately record by his choice of framing the photograph and even how it is perhaps cropped even further, leaving out the "unnecessary".
Photography can only represent the present. Once
photographed, the subject becomes part of the past.—Berenice
Abbott
To be completely objective (truthful) a photograph would have to record all known time and space at a particular instant— basically where everyone was and what they were doing at that instant of time, across the entire known universe. Of course, this is not possible (yet). So we have to settle for recording the briefest instant of time and space through a microscopic window.
So if a photograph is not really reality, is there a point in debating the propriety of post-processing images— from something as simple as colour correction to hours of manipulation in Photoshop?
Update Tue Apr 14 17:27:33 2009: David responds:
Your mind makes your reality.
—Frank Herbert, Bene Gesserit from the Dune series
Yes, there is:
What about people who don't do post-processing? I know for all of my photos I haven't bothered mostly because of laziness and indifference. All the (private) pictures that I have up aren't even colour-corrected.
Perhaps instead of an absolute statement of 'not reality', we simply think in terms of relative distance from reality? Maybe a (subjective?) scale could be thought of?
Post-processing may actually help bring an image closer to reality. The human eye has a higher dynamic range that most (all?) cameras, and so using exposure bracketing and subtle HDR techniques would show people what was there.
The lanterns in the lane is something that you would probably see if you were there. While I generally don't do post-processing, using the above technique to show the prints on the lanterns is something I would be tempted to do if I had a camera that had exposure bracketing (which even the new 'low-end' Nikon D5000 does).
The debate is worth having, even if it simply reminds people of possible photo manipulation that can occur (for either altruistic or nefarious purposes).
Things As They Are (Not), Part 2
philosophy
To continue the discussion, let's use a simpler photographic manipulation than Photoshop— the on-board flash.
The average point and shoot camera user has the camera set on full auto and inevitably, due to the inherent liminations of the camera most all indoor shots are taken with the flash firing to compensate for the lack of light indoors. Does anyone debate the validity of the flash as a manipulation of reality? No, of course not; it's taken for granted.
The addition of light helps the viewer see what is in the picture. There is no question that the photograph looks hideous, but that is the nature of the point and shoot flash.
The next higher level of flash-manipulated photography is the professional studio photograph taken with a softbox, a beauty dish and strobes diffused with umbrellas. This setup creates beautiful portraits and hides many of the subject's flaws. Given a choice between a photograph of themselves taken with a point and shoot and one done in a studio, people inevitable prefer the studio shot.
No one debates the propriety of using studio lighting to improve photography or cinematography for that matter (which is essentially "painting with light"). So why are Photoshop manipulations of photographs looked at so poorly?
There are so many variables to contend with from the point when the rays of light reflect off "reality" to the point when they captured by the camera, processed (in-camera and then out of camera) and then are viewed sometime in the future:
- what does the camera see (considering it has hardware limitations
like the 8-bit or 14 bit A/D and the laws of physics)?
- what does the photographer see (from his vantage point)?
- what does the photographer want the viewer to see (by zooming in or out of the scene)?
- what does the viewer see (due to post-processing of the image,
limited ability to see colours or perhaps colour-blindness)?
- how does the monitor calibration affect what the viewer sees?
- how does the colour-matching affect the final printed photograph?
- what does the viewer's mind see?
There is no question that very little of real reality is actually
contained in a photograph and very little of this reality is
apparent to the viewer.
Thu Apr 16 06:54:16 2009: David responds:
What about those of us that have never used flash?
I am not some kind of purist, insisting on no processing, but simply do not have the equipment or patience for all of these high falutin' techniques. Whenever I shot with my Canon S60, I always turned off the flash, and if I couldn't capture a usable image in this way, then so be it.
> There is no question that very little of real reality is actually
> contained in a photograph and very little of this reality is apparent to
> the viewer.
What is reality? Whose reality? What do you classify as "real"? What if using a flash (either bounced or via a soft box) would actually allow the image sensor / film to recreate what the human eye sees: wouldn't this "manipulation" actually bring the image closer to "reality"? Is reality what a typical (non-colour blind) person sees?
What if the "reality" you are trying to capture isn't what the eye sees,
but the deeper character of the subject?
Download Picture Styles from Canon
technique
Thu Apr 16 16:58:49 2009
You can download additional Picture Styles and save them into the three user-defined slots provided.
The Snapshot Portrait style seems the most useful to me and I would have downloaded Studio Portrait but I don't have a studio. The other ones, except for Clear, seem like gimmicks; I didn't notice any difference when viewing the Autumn Hues style.
Fri Apr 17 15:08:16 2009: The loading of the picture style was uneventful and went according to plan (it requires the EOS Utility program, which I kept when I deleted DPP). I didn't get a chance to photograph anyone using the style.
Qtpfsgui
hdr software
Thu Apr 16 17:41:18 2009
I downloaded Qtpfsgui (I have no idea what it stands for, though QT is named after the QT toolkit) to try making some high dynamic range photographs. The OS X version also requires you to download the DMG with the QT toolkit for OSX, in addition to the software itself.
Fri Apr 17 13:38:27 2009: The installation process of both the QT libraries and Qtpfsgui went smoothly (remember to customize the Qt install by deselecting the QT documentation, headers and examples).
My first attempt at creating an HDR image was unsuccessful because the subjects I was photographing— students sitting infront of a bright window— moved in one of the three photographs.
From an interface standpoint, the process of creating an image is quite intuitive— select one of the three images and use the arrow-buttons to position it so it aligns with the other three images. The tone-mapping and other functions will require some reading.
BME Openhouse Pics
photos
Tue Apr 21 12:19:14 2009
The photos from my last shoot (mentioned earlier)— the biomedical engineering open house— are now available for your enjoyment; everyone has signed photo releases.
The amazing quality of ISO 1600 (down-sampling helps reduce the noise) still amazes me; I know it shouldn't, but I'm comparing it to 400 ISO on the S60.
Note that not all the photographs are mine; Dr. Smith included some of the ones he took, of the people I missed. #53 is with the 50/1.4 lens I was using to take test photos before the openhouse started; the rest are 24-105/4L. #50 and #55 aren't mine.
Firmware Update 1.06
firmware
Thu Apr 23 09:29:32 2009
Canon announced a firmware update for the 50D, the 450D and the 1000D. The firmware adds support for flash-assist for the new model flash, detailed diagnostic error messages and fixes artifacts in sRAW.
Thu Apr 23 23:49:43 2009: Firmware (about 10MB in size) updated successfully.
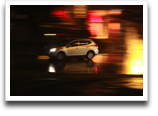
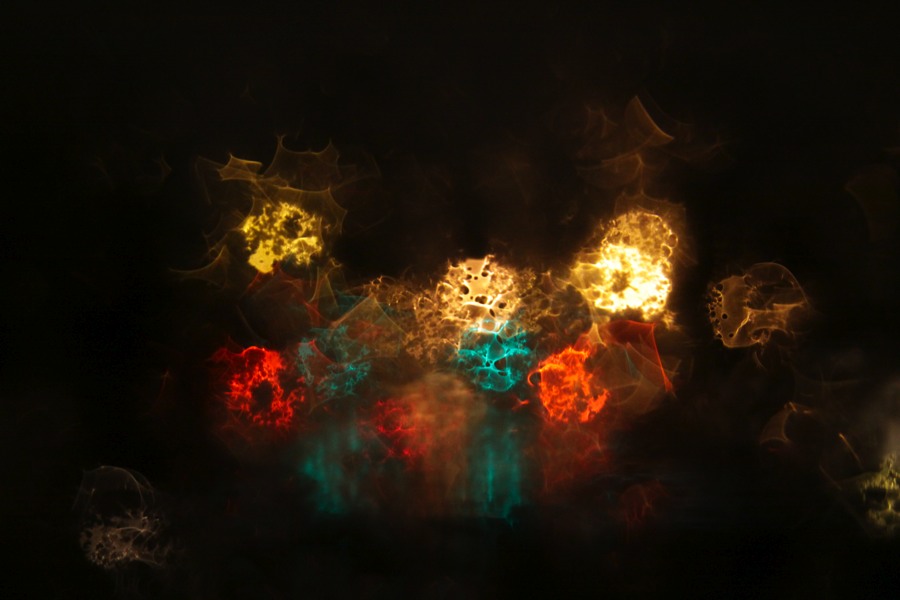
Wet Bokeh
photo
Sat Apr 25 09:28:06 2009
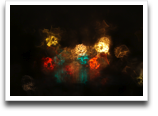 |
The out-of-focus traffic lights down the block, but with a twist— it was raining heavily that evening and the rain was splashing on the window. |
One of my favourite wallpapers. The distortions have a computer-generated look look to them.
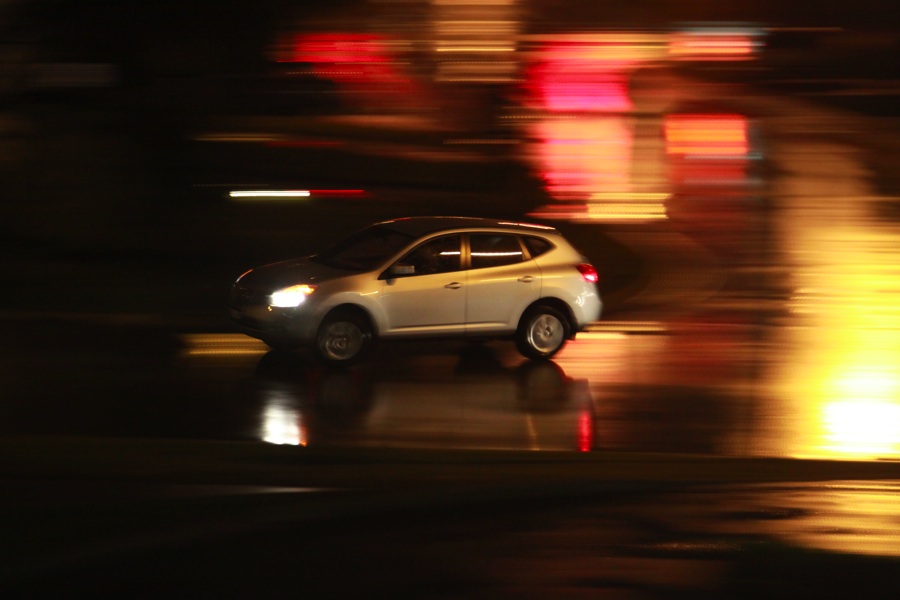
Wet Night Panning
photo
Sat Apr 25 22:29:09 2009
 |
Aperture Priority (yes, I know I should have
been in Shutter Priority mode), 1/6s, f/4, ISO 1600, +1/3 EV, Evaluative
Metering [1 of 8] |
I accidently (I forgot I had the camera on high-speed burst mode from earlier in the day, when I happened to photograph two nubile girls running for cover as the severe thunderstorm descended and the high wind was doing its best to strip them of their summer clothing; and those shots would have turned out better if I had not switched from AI Servo to One Shot) discovered that panning night shots on wet streets look amazing. The one I selected was the best of about 20 minutes worth of work and 4 different cars; the photos of the lighter-coloured vehicles look better.
Portfolio: Lucy Nicholson
photographer
Sun Apr 26 09:59:11 2009
Lucy Nicholson is a
Reuters photographer
who covered
the Beijing Olympics from the roof of the Bird's Nest Stadium and whose photograph made the cover
of TIME.
A story about her video work, profiling the Naked Cowboy in Times
Square,
in a
story is featured in the recent issue of the Digital
Journalist.
View From Your Window
photos
Sun Apr 26 23:07:12 2009
I was just browsing the blogs (via the "Next Blog" link on Blogspot) and (after two clicks) I came arrived at the View From Your Window blog where people submit photographs taken from a window (house, car, airplane, etc.).
I submitted my photograph of
the Lufthansa jet, taken from my balcony window back in February.
Local Contrast Enhancement
technique
Mon Apr 27 09:32:47 2009
A follow-up on my unsharp mask settings post, I came across an article that suggests 20/60/0 values for the Amount/Pixel Radius/Treshold settings— which produce what is known as local contrast enhancement.
Cambridge in Colour has a nice tutorial on the subject.
White House Photostream on Flickr
photos
Wed Apr 29 17:33:03 2009
Pete Souza's photographs are on Flickr. It's mostly boring. The president shoots Canon (it's a prime L lens, but I can't tell what it is. David says it's a 35mm)!
Design Project Open House
journal
Thu Apr 30 20:52:18 2009
I am having dinner at home as I write this; having walked home through the rain with my camera! I covered my camera bag with a makeshift raincoat to keep the water off. I was rather disappointed to learn that the forecast called for rain today, because I had to take my camera in to photograph the annual departmental open house.
I was considering leaving my camera at work and bringing it back tomorrow. However, at the end of the day I decided to take tomorrow off as I was too tired from having walked the equivalent of 8 city blocks as I photographed this event.
I photographed the open house in two passes. The first pass, as the students were setting up, was with the 50/1.4 for closeups of the project hardware itself. I then took a break to drink some water and eat a muffin before I made the second pass with the 24-105/4L for the group photos and general ambience shots. I had to reschedule the group if they were busy presenting their project to visitors when I dropped by. After I had most of the groups covered, I made a copy of the CF card to my Mac Mini, took another break, ate an apple and went back to shoot some missing groups. I then copied the remaining photos off the CF and cut a DVD. In total, I shot 2.2GB of photos but I will be throwing away 2 of 3 photographs of most of them.
I used a lesson learned from the BME Openhouse and decided to shoot with auto exposure bracketing (+/- 1/3EV) in high speed burst mode, since the lighting conditions varied from lab to lab and from station to station, within the same lab. I also shot at medium resolution (8MP) to conserve space (I had approximately 4GB of my 8GB card free) using Auto ISO and AWB. I also used the Snapshot Picture Style, which I downloaded from Canon's website.
I happened to cross paths with the university photographer (who shoots Nikon) and we exchanged dirty looks. I had one student with a Rebel ask me how to shoot in high-speed mode— he was in Full Auto, which has high-speed disabled— once he switched to one of the other modes, it was available. I spotted one student with a Nikon something-or-other and one student had his dad's Canon AE-1 which I regret not photographing!
By the end of the evening, I was so tired, I was making mental mistakes like forgetting to switch back to AEB and forgetting to choose a new focus point when going to the new group.
I did manage to get one of my photographs mapped on the background of our home-page (you have to refresh the page as it's a random image selection everytime you visit) before leaving for home. I am too tired right now, to put up a thumbnail.
Continued...