ECB NETWORK USER'S GUIDE

Why You Should Read This Guide
This guide is for new users of the Toronto Metropolitan University Electrical, Computer and Biomedical Engineering department's computer network. Please browse through the table of contents for a overview of the types of questions (collected over several years and asked by new users of the department's networking facilities) that this guide answers.
Availability
This guide is available online at: http://www.ecb.torontomu.ca/guides/user/
Typographic conventions
Interactive Unix commands are typed into a terminal window (e.g. xterm). Examples that depict user input to a terminal window are typeset as follows:
mkdir ele532
This indicates that you have to type mkdir ele532 and then press the Return (or Enter) key.
The output of a program is typeset as follows:
Rank   Owner/ID    Class  Job   Files     Size    Time
 1    bob@thor       A    424  lab1.ps    33244   07:40
 2    jsmith@thor    A    425  report.ps  18265   07:42
CONTENTS
- ECB NETWORK AND LAB RULES (Updated Sep. 2022)
- REPORTING PROBLEMS
- LOGGING IN AND OUT
- YOUR ACCOUNT (Updated Dec. 2022)
- About your ECB account
- Your home directory
- Conserve home directory diskspace
- Delete core files
- What is taking up all my diskspace?
- How much diskspace am I using?
- Reduce Firefox cache
- Upload your files to your Google Drive
- INTERACTING WITH THE TERMINAL
- PRINTING
- What are the printers called?
- How do I print a file?
- I can't print my file, it's too big
- How do I view/print PDF files?
- How do I convert a PDF file to PostScript?
- How do I print multiple pages of a PostScript document onto a single sheet?
- UNIX FILE PERMISSIONS
- REMOVABLE MEDIA
- MISCELLANEOUS QUESTIONS
- How do I undelete a file?
- Working with .tar files
- How do I find out more about a command?
- Additional documentation
- Is there a word processor on the system?
- Can I run Windows?
- My workstation is not responding, what do I do?
- How do I setup my home-page?
- How do I display an image in the background?
- REMOTE ACCESS
- How do I setup my ECB 2FA Google authentication? (Updated Sep. 2022)
- How do I login from home? (Updated Sep. 2022)
- How do I read my email?
- How do I forward my EE email to another account?
- How do I prevent email to my account during the summer break/Internship?
- How do I filter out junk mail?
- How do I block spam email?
- APPENDIX


ECB NETWORK AND LAB RULES
As of September 2022 the University has mandated all remote SSH connections have to be validated by two-factor authentication (2FA). Please note that the ECB Login 2FA credentials are unique to the ECB Department and are different than the login and 2FA credentials of your TMU account or CS account. If you do not have the Google Authenticator Token generator "ECB_Dept_AuthCode" on your Google Authenticator mobile app you will need to configure this first.
There are numerous computer networks within the University; each department may have one or more computer networks. Many of these networks only use the University's internet connection solely for internet connectivity. The Electrical, Computer, and Biomedical (ECB) Engineering Department has its own network for undergraduate labs on the 3rd and 4th floors of the ENG building. The Computer Science department has their own network with its own login and 2FA credentials; ECB students taking any CPSXXX courses that require access to the Computer Science department's labs need to contact the IT staff of the Computer Science department on the 2nd floor of the ENG building.
All the workstations in the department (in the labs, in the administrative and faculty offices) are networked together with home directories and applications served from a central file server. The network consists x86 workstations running CentOS Linux with Windows emulated in VMWare.
All users should be aware of the following rules governing the use of the network, the labs and the workstations:

- USE OR TRAFFICKING OF UNLICENSED SOFTWARE OR FILES IS FORBIDDEN.
- DO NOT BRING FOOD OR BEVERAGES INTO THE LABS.
- DO NOT DISPLAY OR PRINT MATERIAL IN THE PRESENCE OF THOSE WHO MAY BE OFFENDED.
- DO NOT UNPLUG OR REBOOT A WORKSTATION, OR DISCONNECT ANY NETWORK CONNECTIONS.
- DO NOT ATTEMPT TO BREAK OR COMPROMISE NETWORK SECURITY.
- NEVER DIVULGE YOUR PASSWORD TO ANYONE.
- PLEASE KEEP THE LABS CLEAN BY PROPERLY DISPOSING OF ANY TRASH.
ANYONE FOUND WITH FOOD OR DRINK IN THE LAB WILL BE ASKED TO LEAVE THE LAB AND TAKE THEIR FOOD OUTSIDE THE LAB. BRINGING FOOD OR DRINKS IN THE LAB MAY ALSO RESULT IN LOSS OF LAB ACCESS AND LOGIN PRIVILEGES.
ALL USERS WHO HAVE AN ACCOUNT ON THE DEPARTMENT'S COMPUTER NETWORK IMPLICITLY AGREE TO ABIDE BY THESE RULES AND BY THE STUDENT CONDUCT CODE ESTABLISHED BY TORONTOMU ACADEMIC COMPUTING SERVICES AS SPECIFIED IN THE UNIVERSITY CALENDAR UNDER THE SECTION TITLED COMPUTER SERVICES/FACILITIES.
REPORTING PROBLEMS
If you encounter a problem with any lab equipment, a specific workstation or printer, please note the name of the workstation/printer, the room number it is situated in and report it to a staff member. Contact information for technical staff responsible for a particular lab is posted on the inside of every lab door.
If you need help logging in you can contact: accounts@ee.torontomu.ca
LOGGING IN AND OUT
Logging in to your account
You will need a login ID and a password before logging onto the ECB network; the login-screen resembles the image below:
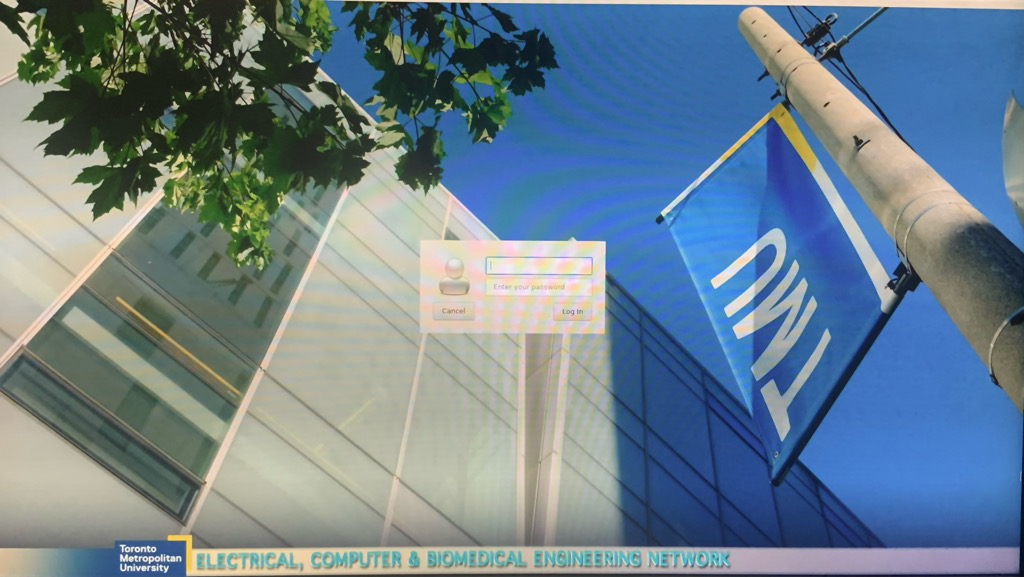
Login screen of the workstations on the Electrical, Computer and Biomedical Engineering Network.
MOVE THE MOUSE TO WAKEUP THE DISPLAY; if you type a character (like the spacebar) it will be input into the login field and your login will fail.
Your login ID
Your login ID name on the Electrical, Computer and Biomedical Engineering network is the same as your my.torontomu short ID (8 characters). Please see the next section.
How do I find my.torontomu short ID
- Login to my.torontomu.ca.
- In the Self-Service section on the right, click on the "Personal Account".
- In the General section, click Personal Information link.
- Your Short ID is listed under "my.torontomu Short ID".

After logging in to my.torontomu, in the Self-Service section, click on .

In the General section, Click on link.
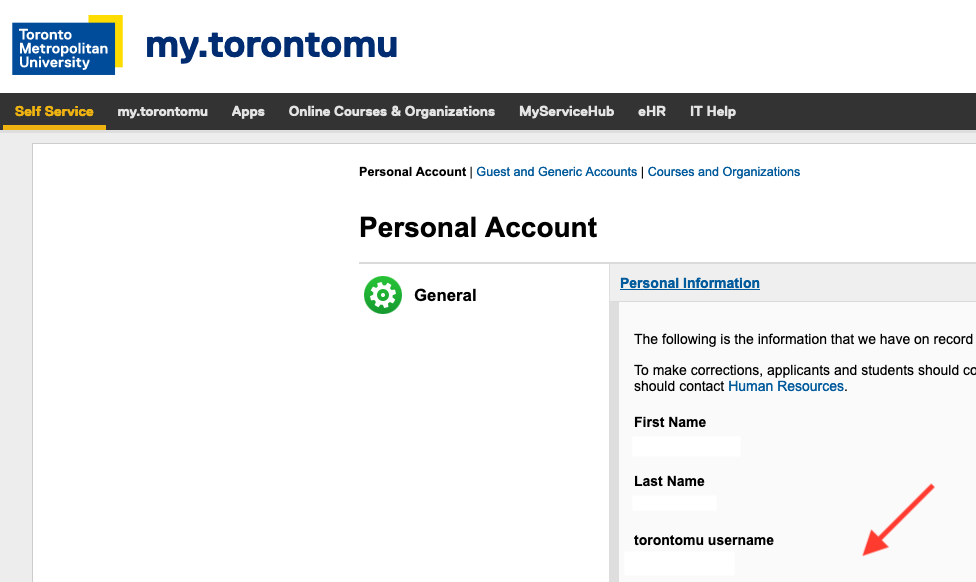
Your Short ID is found under .
Your initial password
Your initial password will be your student number. The first thing you should do after logging in, is to change your password (refer to section 2.2.1), to prevent other students from abusing your account.
IMPORTANT NOTE: WHEN TYPING IN YOUR STUDENT NUMBER, DO NOT USE THE NUMERIC KEYPAD; INSTEAD, USE THE NUMBERS ALONG THE TOP OF THE KEYBOARD.
Logging in
To login to your account:
- If the screen of the workstation is blank, move the mouse.
- Type your login ID, press Return.
- Type in your password (it will not appear when you type it in), press Return.
If you are unable to login, ask network operations staff in ENG439 for assistance.
Your password
Before changing your default password, you should choose a secure password (refer to section 2.2.1, below). It is important to have a secure password to ensure the integrity of both your account and the network.
A password is considered secure if it is difficult for someone else to guess it (this includes those who use "cracker" programs that attempt to guess passwords).

NEVER DIVULGE YOUR PASSWORD TO ANYONE, INCLUDING YOUR FRIENDS, FAMILY MEMBERS, OR PETS. IF YOU RECEIVE AN EMAIL REQUESTING YOUR STUDENT NUMBER, PASSWORD, DATE OF BIRTH, OR OTHER PERSONAL INFORMATION, DISREGARD IT— DO NOT RESPOND TO IT, JUST DELETE IT.
The account owner will be held responsible for any actions performed from their account.
Choosing a secure password
Following these few rules will ensure a secure password:
- Don't use your login name (as-is, reversed, capitalized, doubled, etc.).
- Don't use your first name or last name in any form.
- Don't use your wife/girlfriend/husband/boyfriend/child's name.
- Don't use other information about yourself that can be easily obtained (telephone number, student number, license plate, street name, etc.)
- Don't use all digits or all the same letter.
- Don't use a word contained in English (or other language) dictionaries.
- Make sure your password is a minimum of 8 characters in length.
- Make sure it contains both upper and lower case letters, numbers and punctuation.
With all these restrictions, you're probably wondering what's left; here are a few suggestions:
- Choose a line from a favourite movie, TV show, song or poem and use the first letter of each word; e.g. "Let me take you down 'cause I'm going to Strawberry Fields" becomes: Lmtyd'cI.
- Choose 2 small words and concatenate them together with numbers and punctuation; e.g. pIe;3at, or Mug-@Bog.
Changing your password
Once you have thought of a secure password, here are the steps for changing it:
- Login (refer to section 2.1 for details).
- Select
- Follow the instruction that appear in the window.
You will be asked to enter your old (current) password (which will be the first 8 digits of your student number), then you will be asked to enter your new password twice.
Logging Out
Select from the menu to logout.
YOUR ACCOUNT
About your ECB account
There are numerous computer networks within the University; each department may have one or more computer networks. Many of these networks only use the University's internet connection for internet connectivity alone. The Electrical, Computer, and Biomedical (ECB) Engineering Department has its own network for undergraduate labs on the 3rd and 4th floors of the ENG building. Please note that the ECB Login 2FA credentials are unique to the department and are different than the login and 2FA credentials of your TMU account. The Computer Science department has their own network which has its own login and 2FA credentials. ECB students taking any CPSXXX courses that require access to the Computer Science department's labs need to contact the IT staff of the Computer Science department on the 2nd floor of the ENG building.
First-year students are not given accounts on the Department network. Beginning with your second year, your account will exist until you either graduate from, or drop out of, the program. Your account remains active during the summer months and during your optional internship work term.
Your home directory
After logging in, you can access all your personal files using either the file-browser (double-click on the "Home-folder" icon on the desktop) or using a Terminal window. When you open either a Terminal window or the file-browser, you will start in your home directory.

Double-click on the Home-folder icon to open the file browser.
How do I conserve my home directory diskspace?
You can conserve diskspace by compressing your files. The program to compress files is gzip; use gunzip to uncompress them.
For example, to compress lab1.ps, type:
gzip lab1.ps
Compressed files are given the extension: .gz.
For example, to uncompress lab1.ps.gz, type:
gunzip lab1.ps.gz
You can also compress the entire contents of a directory by giving the -r option; e.g. gzip -r labs/.
Emacs and xemacs will compress and uncompress files on-the-fly, so if you use either of these editors you don't have to uncompress the files before loading them into the editor.
Delete core files
A core file is a complete snapshot of the memory at the time a program crashes. This file is used for debugging the reason for the crash. core files can be safely deleted.
What is taking up all my diskspace ?
There are two ways to check the file-usage in your home folder. You can view a text list of the 10 biggest files in your home or alternatively you can get a graphical representation of all the files in your home folder.
To get a list of the 10 biggest files in your Home folder, select: .
You can also view the list if you are remotely logged-in or using a Terminal; use the dw command to display a list of the 10 biggest files. dw begins searching from the folder you are currently in. To search the entire contents of your Home folder, cd to your home directory and then run dw. For example,
cd
dw
- 1 jsmith   student    45660784 May 25 13:28 ./ELE404_Lab1_report.pdf
- 1 jsmith   student    40335888 Apr 28 16:24 ./movies/Mov_3071.AVI
- 1 jsmith   student    29538065 Feb  9 00:10 ./Fourier_poster.psd
- 1 jsmith   student    15910040 Apr 28 16:03 ./movies/Mov_3076.AVI
- 1 jsmith   student    15548416 Apr  1 20:17 ./mp3/a_wonderful_place.mp3
- 1 jsmith   student    15119081 Apr 29 16:49 ./public_html/mpeg-binaries.zip
- 1 jsmith   student    15099836 Apr 28 16:00 ./movies/Mov_3074.AVI
- 1 jsmith   student    12227964 May  4 15:22 ./maps/globe.psd
- 1 jsmith   student    11921408 Mar 30 12:17 ./spheric_lounge.ps
- 1 jsmith   student    10485360 Apr  3 18:39 ./mozilla/firefox/zco7r422.default/places.sqlite
To get a graphical view of your file usage, select: . Then in the window that appears, click the button and wait while your directory is scanned.
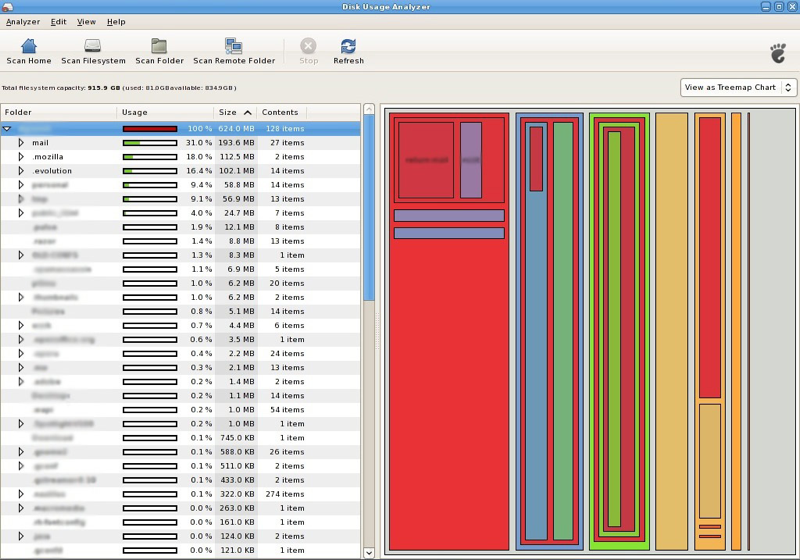
The Disk Space Analyser can display a graphical representation of your home folder showing disk usage. You can change the representation from tree-view to rings-view using the menu on the right.
How much diskspace am I using?
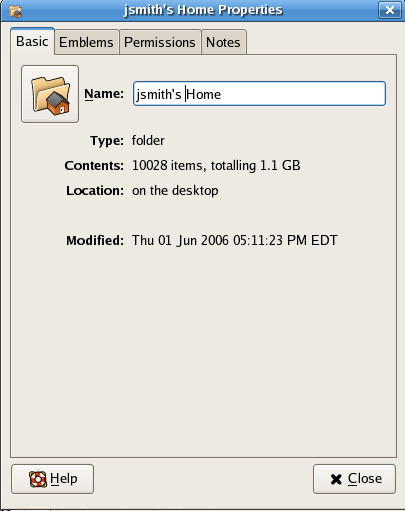
To find the total amount of storage in your home directory: Right-click the on your desktop and select .
Alternatively, you can select . The pop-up window will display your disk usage and quota in bytes.
Empty your Trash

The Trashcan on your desktop is just another folder in your home directory. If you move your files to the Trashcan, they are still taking up diskspace. To delete them permanently, empty the Trashcan.
Print multiple pages of a PDF or PostScript document onto a single sheet
You can save printing costs by reducing and printing multiple pages of any PDF file onto a single sheet of paper (N-up printing); please refer to the Printing section.
Reduce Firefox Cache
Firefox stores viewed files (html and images) in a cache directory called ~/.mozilla/loginame/xxx.slt/Cache so when you re-visit a site, it will read the local copies of the files rather then retrieving them again. It is recommended that the Disk Cache be set to 0 Mb.
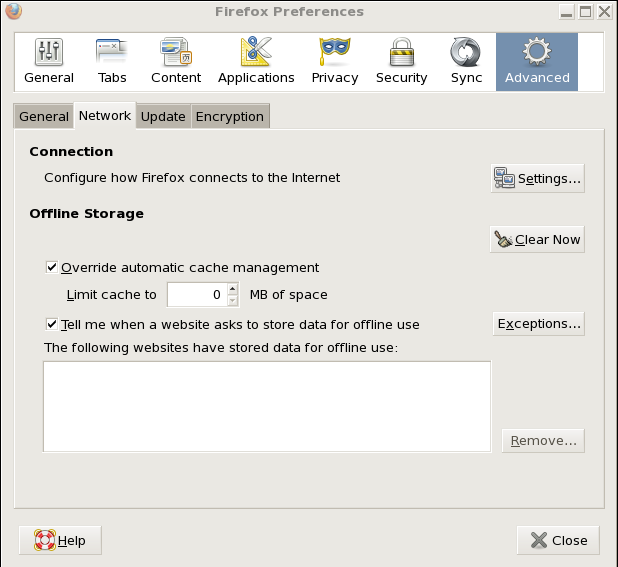
Set the Firefox cache size to 0 via: Edit →Preferences →Advanced →Network.
Upload your files to your Google Drive
You have unlimited storage in your Google Drive. You can upload all your files to your Google Drive and have them available on any computer with a web browser.
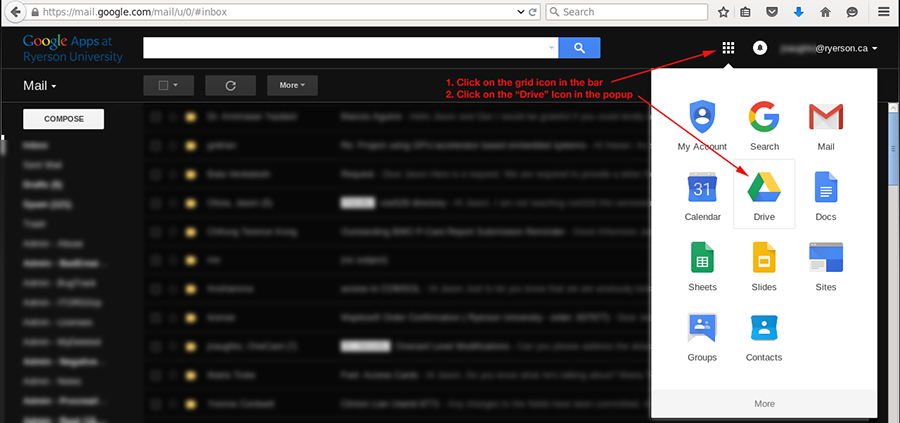
Access your Google Drive via the grid icon in the top-right corner of your Google App toolbar. Click on the Google Drive icon in the pop-up.
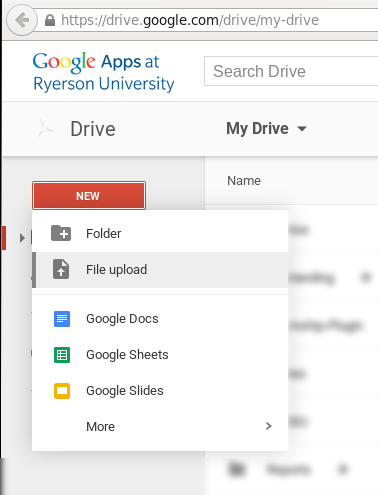
In the new tab that opens, click on "New" in the sidebar and select "File upload" to upload your file.
INTERACTING WITH THE TERMINAL
Most everyday tasks can be carried via menus and by double-clicking, dragging-and-dropping files and icons. However, there are certain tasks that can only be performed via the Terminal; e.g. submitting you labs. So it is to your advantage to familiarize yourself with a few operations of the Terminal.
Working with the shell
The shell is a program that interprets commands that you issue to the operating system. Your default shell is zsh, the Z shell. Any commands executed in a Terminal, are issued by interacting with the Z shell.
The table below summarizes common Unix commands you will find useful.
| Unix Command | Action |
|---|---|
| ls | list directory contents |
| cd dir | change directory to dir |
| mkdir dir/ | create a new directory called dir |
| rmdir dir/ | remove directory called dir |
| rm file | delete file (there is no undelete!) |
| cp source dest | copy a file from source to dest |
| mv old new | rename (move) old to new |
| lpr -Pprinter file | print file on printer |
| lpq -Pprinter | list jobs in the printer queue |
| lprm -Pprinter jobId | remove job jobId from the printer |
| less file | display the contents file |
| ps | list processes currently running |
| kill pid | kill process with id pid |
| man command | displays manual page for command |
| chmod perm file | give file permissions (see sec. 3.5.1) |
| file file | identify the type of file |
The shell prompt
The shell prompt displays the hostname ("sparrow") of the workstation you are currently logged in to and the current working directory ("/home/student2/jsmith"). When jsmith logs in to sparrow her prompt will look like:
sparrow: /home/student2/jsmith>
Listing files
The command to list files (and directories) is ls.
For example, the simplest form of listing shows just the names of files and directories. Names that appear marked with an asterix ' *' are executable programs; names that appear with a slash ' /' are directories.
The ls command has numerous options that modify the listing. All these options are detailed in the on-line manual page. Refer to section 3.7 for help on using the on-line help system.
Filename completion
Filename completion is a feature of most modern shells that saves you from typing long filenames. The Tab key is used to complete a filename (or directory name) after typing the first few characters.
Subdirectories
It is recommended that you organize your labs and assignments by placing them in sub-directories (or "folders") named after each course you are taking.
For example, to create a sub-directory for ELE428, type:
mkdir ele428
To make ele428 your current working directory, type:
cd ele428
The prompt will change to:
sparrow: /home/student2/jsmith/ele428>
It is not necessary to know the exact name of your home-directory. The command cd (with no options) will place you in your home directory.
Running commands in the background
Whenever you type a command and press Return, the command executes and the shell-prompt is ready for the next command. However, if the command takes a long time to execute, or like mozilla (web-browser), opens a new window, the Terminal becomes unusable since the prompt will re-appear only after the command completes or is interrupted (via Control-C). Running a program "in the background" returns the prompt immediately while the program continues to run.
To run mozilla in the background, simply append an ampersand & to the command:
mozilla &
HINT: Invoke commands that create their own application window with an ampersand; e.g. gv &, emacs &, etc.
How do I delete a file?
If you deleted a file using the rm command, it cannot be undeleted. However, an older copy may be recoverable if the file existed on the previous day. To recover an older version of the file please see the section, How do I undelete a file?. If you deleted a file by moving it to the Trash, you can recover it yourself.
The command for deleting files is rm (short for "remove").
For example, to delete lab1.ps, type:
rm lab1.ps
Several files may be deleted simultaneously:
rm lab1.ps lab1.c lab2.*
Directories containing files may be deleted recursively by typing:
rm -rf ele792/
Customizing your shell environment
Your ZSH shell environment can be customized by putting commands in a file called .myzshrc (note the leading period in front of the filename) in your home directory. Environment variables can be set in this file and command aliases can be created and saved in this file. Refer to the manual page for ZSH (man zsh) for more details.
# example .myzshrc file

# set default printer to ENG 408
export PRINTER=prism

# alias called "cb" that starts chrome web browser
alias cb=chrome

# alias called "gru" to ssh to host grunthos
alias gru='ssh grunthos'
Printing
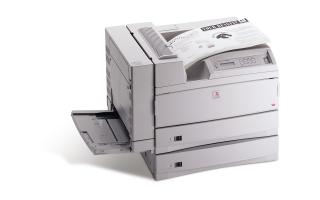
NOTE: To save paper, all printers print on both sides of the paper, by default.
The printer partially ejects the paper before printing on the obverse side.
Do not grab the paper emerging from the printer until it is fully in the tray
or the printer will jam.
All public printers (see Table 3.2, below, for names and locations) in the department are networked. You can print a file from any workstation on the network to any printer on the network.
IMPORTANT NOTE: 1. Beginning in the summer of 2016, authenticated printing has been enabled on all printers– you will be asked your password before the file is printed.
IMPORTANT NOTE: 2. YOU WILL BE UNABLE TO PRINT IF YOUR ACCOUNT BALANCE IS NEGATIVE.
IMPORTANT NOTE: 3. XEROX N24 PRINTERS PARTIALLY EJECT THE PAPER BEFORE PRINTING ON THE OBVERSE SIDE. DO NOT GRAB THE PAPER EMERGING FROM THE PRINTER UNTIL IT IS FULLY IN THE TRAY OR THE PRINTER WILL JAM.
What are the printers called?
Table 3.2 lists the printer names, room locations and capabilities. All printers print double-sided, by default; to print single-sided add the suffix "s" to the name.
| Printer Name | Default | Single-Sided Name | Room |
|---|---|---|---|
| prism | double-sided laser | prisms | ENG408 |
| prune | double-sided laser | prunes | ENG409 |
| piano | double-sided laser | pianos | ENG412 |
| purple | double-sided laser | purples | ENG411 |
| plot | double-sided laser | plots | ENG303 |
| pizza | double-sided laser | pizzas | ENG307 |
Table: Printer names and locations.
How do I print a file?

IMPORTANT NOTE: BEFORE PRINTING A FILE ALWAYS USE THE lpq COMMAND TO CHECK WHETHER THE PRINTER YOU ARE GOING TO PRINT TO, IS READY AND ABLE TO PRINT.
lpq: Check the queue
The command to check the status of the printer and the status of the job queue is lpq. If the printer is busy, the jobs still in the queue, waiting to be printed, will be displayed.
For example, to check the printer status for piano, type:
lpq -Ppiano
If the printer is ready, and if there are no jobs in the queue, the response will be similar to:
Printer: piano@panzer 'Xerox 24N ENG412' (dest raw@piano)
 Queue: no printable jobs in queue
 Status: server finished at 14:10:23
Otherwise, lpq will respond with the location (rank) of the job in the queue, the owner, the job-id, the file name and the file size:
Rank   Owner/ID    Class  Job   Files     Size    Time
 1    bob@vader      A    424  lab1.ps    33244   07:40
 2    jsmith@thor    A    425  report.ps  18265   07:42
lpr: Print the file
Once you have determined that the printer is working, you can proceed to print the file using the command lpr.
For example, to print the file lab1.ps to the laser printer called purple (the -P option is used to specify the name of the printer), type:
lpr -Ppurple lab1.ps
Password for jsmith on prtsrv.ee.torontomu.ca?
To print multiple files to the laser-printer prism, you would type:
lpr -Pprism lab1.c.ps lab1.h.ps
For example, to print single-sided on prune (which, by default, prints double-sided), you would add an "s" to the printer name and type:
lpr -Pprunes lab1.ps
HINT: To avoid specifying the printer everytime you print, add the following line to your ~ /.myzshrc replacing prism with the default printer of your choice:
export PRINTER=prism
(Refer to section 4.2.4 explains how to save paper when printing files.)
I can't print my file, it's too big
To print very large PostScript files (greater than 8 megabytes), use the -s option:
lpr -s -Ppiano very-large-file.ps
How do I view/print PDF files?
Double-click the PDF file in the file-browser to view it. To print the file select: ; select the printer from the tab; select the page-range from the tab; click on .
IMPORTANT NOTE: 1. When printing large PDF files (e.g. data sheets), split the print job into multiple parts by printing a few pages at a time.
How do I print multiple pages of a PDF or Postscript document onto a single sheet?
Multiple pages of any Postscript file can be reduced and printed on a single sheet of paper (N-up printing) using the psnup command. Note that before you N-up a PDF document, you must first convert it to Postscript using the following steps...
Convert a PDF file to PostScript prior to N-up
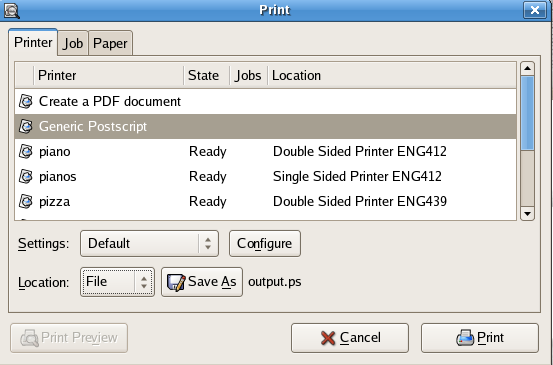
PDF files can be converted to PS by selecting as the printer and .
- Double-click the PDF file
- Select
- From the tab, select
- From the pull-down menu, select
- Change the filename, if necessary, and click
- Use psnup to print multiple pages of the document on a single sheet.
Print the PostScript document via psnup
For example, to print 2 pages per sheet (4 pages double sided) of the Postscript file, report.ps, to printer piano, type:
psnup -n 2 report.ps | lpr -Ppiano
Those with exceptional eyesight may wish to try 4 pages per page (8 pages, double sided):
psnup -n 4 report.ps | lpr -Ppiano
UNIX FILE PERMISSIONS
By default, other students or faculty on the system cannot read your files. You must explicitly allow them access by modifying the access permissions on the files or directories.
All the files and sub-directories in your home-directory are owned by you. They can be protected from or made accessible to other users by changing the access permissions. You may only change the permissions on files you own.
To look at the file permissions (and other information) use the ls -l command; open a Terminal and type:
ls -l
For each file in your directory, you will see a line similar to Figure 3.1:

File ownership and permissions displayed in a long-listing using the ls -l command.
The first item, -rwxr-xr-x is a rwx triplet for each of owner, group and other for the file. It represents the Read, Write and Execute permissions for the owner of the file, you (rwx), users belonging to the same group as you (r-x), and other users (r-x).
The next item, 1, represent the number of links to the file; jsmith, is the username of owner; student, the name of the group which owns it; 365, is its size in bytes; Feb 22 15:31, the time and date the file was last changed, and finally, lab1.c, is its name.
How do I change permissions?
The chmod command is used to modify permissions on files and directories. Table 3.3 summarizes the available options.
| Option | Description |
|---|---|
| + | grant permission |
| - | remove permission |
| u | user (your permissions) |
| g | group (users in your group) |
| o | other (everyone else) |
| a | specifies all (u, g and o) |
| r | read permissions |
| w | write permissions |
| x | execute permissions |
Summary of chmod options
For example, to prevent other people from reading lab1.c ( -rwx --- --- ), type:
chmod g-r,o-r lab1.c
For example, (this is only an example) to allow all users to access your lab1.c (-rwx r-- r-- ), type:
chmod g+r,o+r lab1.c
a better alternative, is to type:
chmod a+r lab1.c
For example, to write-protect lab1.c.backup from accidental deletion (disable write permissions for all), type:
chmod a-w lab1.c.backup
How do I copy files to/from a USB key?

Double-click the USB key on the desktop to access the files. BEFORE
REMOVING THE KEY,
YOU MUST UNMOUNT THE DEVICE: .
Most PC workstations have USB ports either on the front-bottom or in the back. When inserted, the key will appear on the Desktop; double-click the icon to view the files.
The drive is mounted as a filesystem in /media/disk/. You may use a Terminal and all the normal Unix commands, (ls, cp, rm, mkdir, mv) to copy files to/from the key, rename and delete files on the key.

IMPORTANT NOTE: before removing the key from the computer, you must "Unmount" the USB-drive: . If you do not unmount the drive, your data will not be saved on the drive.
How do I access the CD/RW drive?

Some labs have workstations that are equipped with CD/RW drives. A data CD inserted into the drive appears on the desktop; double-click on the icon and the files will appear in a file browser.
To write data to a CD/R or CD/RW:
- Insert the blank CD into the drive and wait until the icon named "Blank CD" appears on the desktop.
- Select from the Desktop Menu.
- Drag the files and/or folders you wish to write to the CD into the CD/DVD creator window.
- Click .
- Click on the dialog that appears.
- Wait until the dialog completes.
- Click , then .
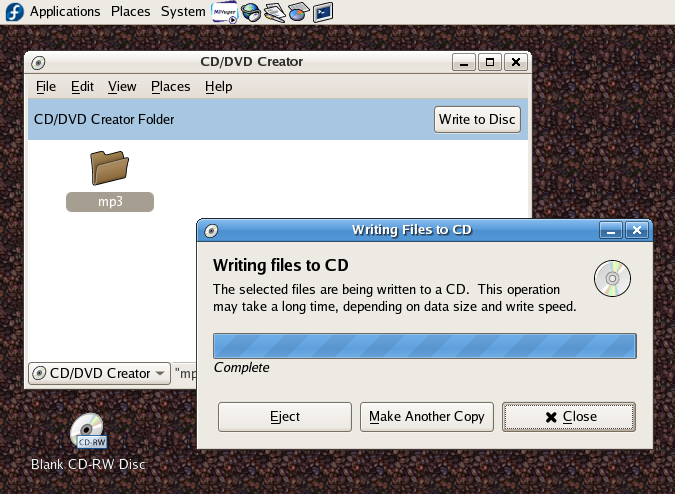
Drag the files and folders into the CD/DVD creator window, click , and wait for the dialog.
MISCELLANEOUS QUESTIONS
How do I undelete a file?

If the file you deleted is still in the , you can still recover it. Once your trash is emptied, or if you used the rm command, files cannot be recovered.
However, since your home-directory is backed up nightly, an earlier version of a deleted file can be restored, if it was created on the previous day.
To recover a file, you need to email: admin@ee.torontomu.ca
- the name and complete path of the file(s) to be recovered,
- the exact day and time you deleted it,
- and the time the file was originally created.
For example,
Please restore ele428/lab6/main.c and ele428/lab6/parser.c deleted on April 16th at 1:20PM and created 2 days ago.
Working with .tar files
A Unix TAR (TApe aRchive) file is similar to a Windows ZIP file. A TAR file with a .gz extension has been compressed with gzip (.tgz is a synonym for tar.gz).
To view contents of the tar file lab1.tar, type:
tar tvf lab1.tar
To view contents of a compressed tar file lab1.tar.gz, type:
tar ztvf lab1.tar.gz
To extract the contents of lab1.tar.gz, type:
tar zxvf lab1.tar.gz
To create a compressed tar file called ele792.tgz with the contents of a directory called ele792, type:
tar zcvf ele792.tgz ele792
How do I find out more about a command?
Online help is available for every Unix command in the form of manual-pages. Each manual page explains how the command can be used and the numerous options available. Use the man command from a Terminal window.
For example, to read the man-page for the ls command, type:
man ls
The output will look like this:
LS(1V)                   USER COMMANDS                     LS(1V)

NAME
     ls - list the contents of a directory

SYNOPSIS
     ls [ -aAcCdfFgilLqrRstu1 ] filename ...

SYSTEM V SYNOPSIS
     /usr/5bin/ls [ -abcCdfFgilLmnopqrRstux ] filename ...

AVAILABILITY
     The System V version of this command is available  with  the
     System  V software installation option.  Refer to Installing
     SunOS  4.1  for  information  on  how  to  install  optional
     software.
Use the space-bar to page through the document; 'q' to quit.
Manual apropos
If you don't know the command name but know what the command does, you can use the -k (keyword) option to man to find the appropriate man-page. For example, to find information related to audio applications, type:
man -k audio
The output (on a Linux system) will resemble the following:
workbone (1)     - A program for playing audio CDROMS
audiocompose (1) - Compose an audio fragment
audiosend (1)    - Send an audio email message
showaudio (1)    - Play an audio email message
Each command that matches the keyword is listed on a separate line showing the command name (showaudio), which section of the man-page it appears in (1), followed by a brief description of the command.
Additional documentation
Various guides, on a variety of topics, are installed in /usr/common/docs/guides/.
How do I copy and paste text with the mouse
Alphanumeric text can be copied from one application to another, using only the mouse. This technique is useful for copying and pasting between Terminal windows.
To copy text:
- Press and hold mouse button-1 (left).
- Drag the mouse to hilight the text.
To paste the selected text:
- Move the mouse to the application window you wish to paste the selected text into.
- Press the mouse button-2 (middle).
Is there a wordprocessor on the system?
LibreOffice is a freely available office suite, very similar to MS Office, that includes a word-processor, a spreadsheet, a presentation program (like PowerPoint) and a drawing tool. It can import and export most common document formats like MSWord, PowerPoint, Excel, WordPerfect, etc.
The word processor is available from the menu:
Can I Run Windows?
All the workstations can run Windows as a client operation system via VMWare. To run Windows, select: .
Note that all changes you make to Windows will be lost when you exit VMWare. SAVE YOUR FILES IN THE S: DRIVE WHICH IS MAPPED TO YOUR HOME DIRECTORY.
My workstation Is not responding, what do I do?
DO NOT RE-BOOT THE WORKSTATION!
One possible reason for your workstation "freezing" is that a program (usually mozilla or Altera) has crashed or is a runaway (using 100% of the CPU).
In such cases, you can login from another workstation and either kill the mis-behaving program or log yourself off.
In the following example, assume the hung workstation is called nautilus and the user is jsmith; here are the steps to remotely login and list the running processes and then kill a process:
- Login to another workstation and open a Terminal (if there are no workstations free, ask someone next to you if you can use one of their Terminals).
- Remotely login to the hung workstation; type: ssh nautilus (if the workstation refuses your ssh connection, contact one of the network operations staff in ENG439 )
- Get a list of the running processes; type: ps -ef
You will see a listing similar (albeit longer) to this:
  root 102   6750  0   May 12  ?        0:03 nscd
jsmith 15161 9645  0 17:13:32  ?     1143:49 altera
  root 274   6750  0   May 12  ?        0:00 update
jsmith 1039  3550  1   May 12  pts/1    0:00 ps -ef
jsmith 32287 26271 0 11:41:36  ?        0:02 xterm
jsmith 1196  26271 0 11:41:38  ?        0:00 gnome-session
ps displays a list processes with the owner in the 1st column and the process-id (PID) in the 2nd column; the last column has the process name.
- Scroll through the listing and find the process you want to kill (e.g. altera) and type: kill -9 15161 (PID from the second column). To log yourself off, kill the process named gnome-session with PID 1196.
If the above steps do not work, then see the network operations staff in room ENG439.
How do I setup my home-page?
To create a default homepage, which you can later edit, and have the file and directory permissions correctly set, open a Terminal and type:
homepage
This program will create a public_html directory and a file called index.html, which is your home-page.
For example, the URL for jsmith's home-page will be:
https://www.ee.torontomu.ca/~jsmith/
IMPORTANT NOTE: ALL the files in ~/public_html (including images), that are refered to in your home-page, must have their global read-permissions set (chmod a+r filename.html) and directories (including your home-directory) must have global execute permission set (chmod a+x dirname). Refer to section 3.5.1 for an explanation of Unix file permissions/ownership.
How do I display an image in the background?
Use the menu to select the image you wish to use. You can also drag and drop your personal images into the dialog and use them.
REMOTE ACCESS
How do I setup my ECB 2FA Google authentication?
(Updated Sep. 2022)
As of September 2022 the University has mandated all SSH connections to be validated by 2FA verification so you will need to configure the Google Authenticator Token generator "ECB_Dept_AuthCode" before you can login remotely.
Students who have their ECB login and password setup already, can login to any one of the ECB labs on the 3rd and 4th floors of the ENG building. After logging into the workstations within the ECB labs, click on the This process will reset your Google Authenticator 2FA and produce a unique QR code to scan into the Google Authenticator mobile app. Once the QR code has been scanned in successfully a Google Token generator that produces a 2FA code called "ECB_Dept_AuthCode" will appear. This Google code that changes very 30 seconds will be required to be provided at the "Verification Code:" prompt on any ssh connections after entering your ECB password.
How do I login from home?
Updated Sep. 2022
SSH Terminal client.
IMPORTANT: IF YOU DO NOT HAVE THE GOOGLE AUTHENTICATOR Token GENERATOR "ECB_Dept_AuthCode" CONFIGURED, SEE THE PREVIOUS SECTION How do I setup my ECB 2FA Google authentication?.
Once you have your 2FA setup, you connect to the department and access your ECB account remotely via a Secure-Shell Terminal application and use a SFTP File-transfer Application to transfer files.
The ECB Department provides BITVISE SSH CLIENT software for Windows at:
https://www.ee.torontomu.ca/secure/
BITVISE SSH CLIENT INSTALLATION INSTRUCTIONS FOR WINDOWS
First, download Bitvise SSH Installer and double-click the icon.
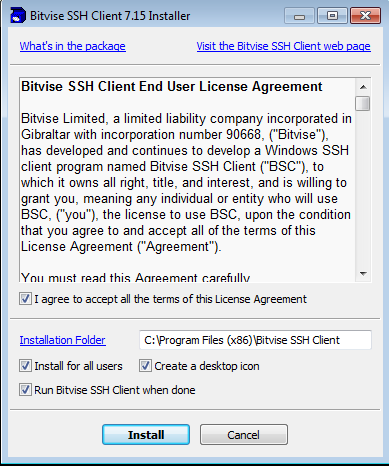
When the dialog appear, click Click
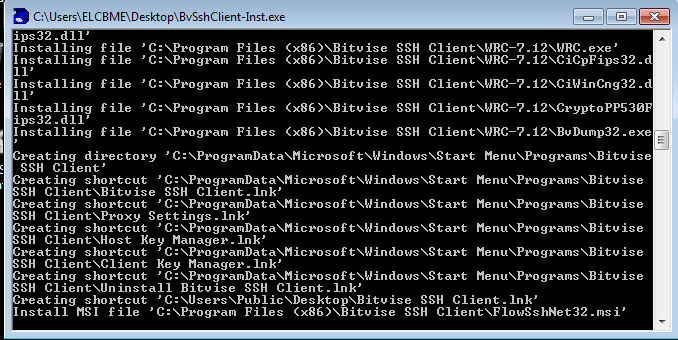
A installer progress-window will appear....
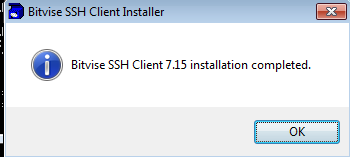
When the "installation completed" dialog appears, click .
Double-click on the application icon that was created on your desktop.
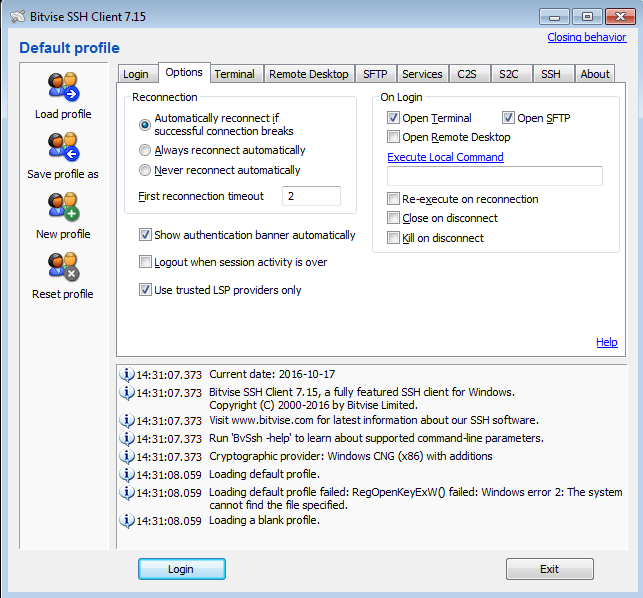
In the tab, you can optionally set your preferences based on whether you want both the terminal and the SFTP window to open.
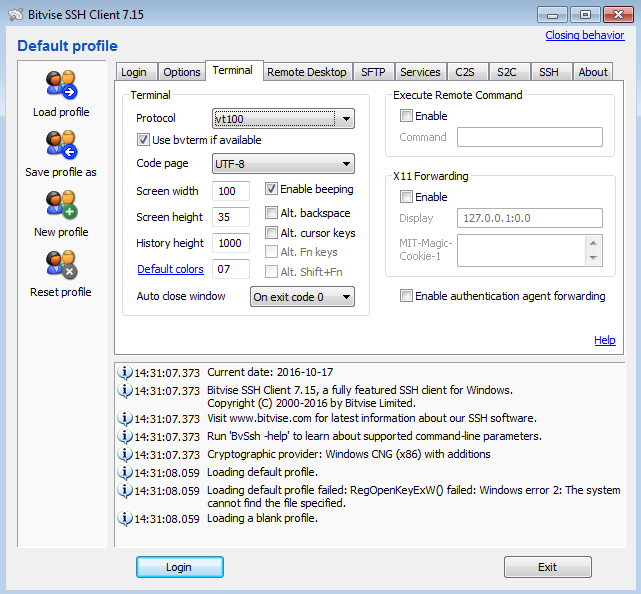
In the tab, set to vt100. You can also set the row/column size of your terminal window
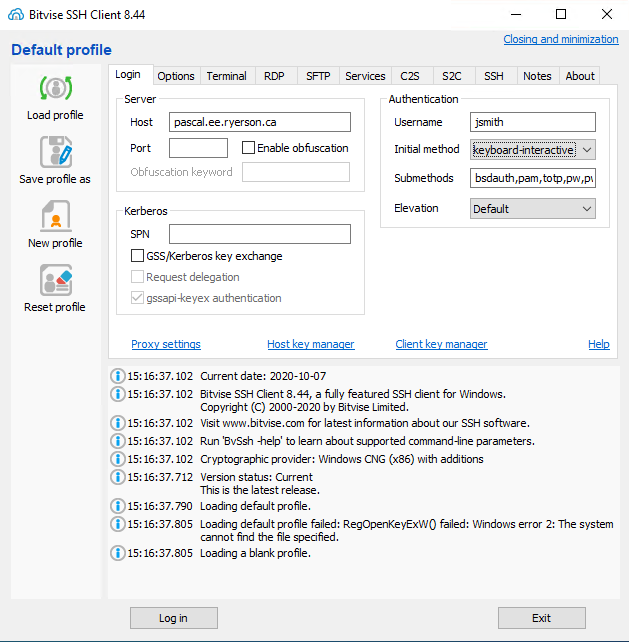
In the tab, fill-in pascal.ee.ryerson.ca as , your EE login in , select keyboard-interactive as and click .
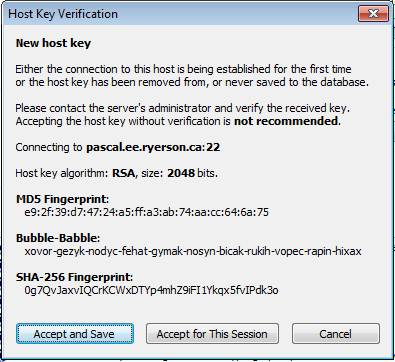
A Host Key Verification dialog will appear, click .
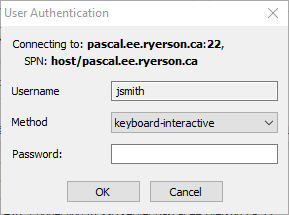
A User Authentication dialog will appear, enter your password at the "Password:" prompt and click .
NOTE: The "Change password" option will not change your password.
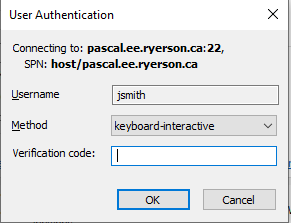
A second User Authentication dialog will appear, enter your ECB 2FA code at the "Verification code:" prompt and click .
NOTE: If you have not setup your 2FA code see How do I setup my ECB 2FA Google authentication?.
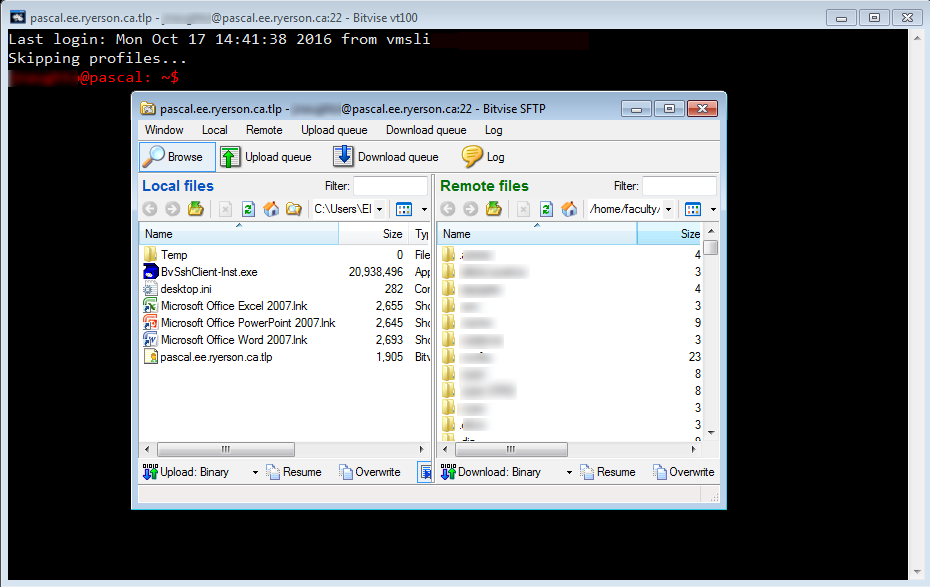
A SSH Terminal window and an SFTP window (local files on the left pane and remote files, your home directory on the right pane) will appear.
How do run programs or scripts on pascal?
After logging in to pascal, you must ssh to one of the workstations in the labs if you need to run or compile programs. In the Secure Shell Terminal window, type: ssh followed by the name of the (workstation you want to remotely login to; the workstation names are displayed on the login screen so make a note of them when you are in the labs). You will be prompted for your password again.
How do I transfer/upload files?
After installing the Bitvise SSH Terminal Client and SFTP Client, refer to the previous section, use the SFTP client to drag and drop files from the left pane (you local computer) to the right pane (your EE account on pascal).
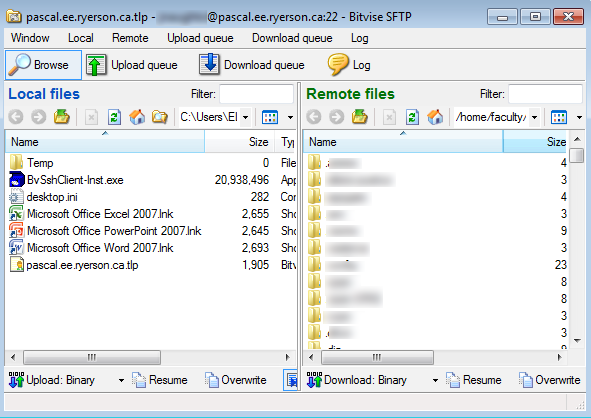
The SFTP window (local files on the left pane and remote files, your home directory on the right pane) can be used to upload and download files (via drag and drop) to/from your EE account to/from you local computer.
How do I read my ECB email?
You can read your email securely from anywhere in the world from:
https://webmail.ee.ryerson.ca
Login using your ECB Department login ID and password.
How do I forward my ECB email to another account?
To have email from your ECB account automatically forwarded to another account, using any text editor, create a text file in your home directory, called .forward which contains the email address you wish your email to be forwarded to (if you have more than one email address, enter each one on a separate line).
For example, if jsmith, wanted all her email from her ECB account to be forwarded to her Gmail account, she would create a file called .forward, containing the line:
janesmith1922@gmail.com
All the email sent to jsmith@ee.torontomu.ca would be subsequently forwarded to janesmith1922@gmail.com.
For example, If jsmith wants to forward her mail to a HotMail account, and also keep a local (EE account) copy she would create a .forward file with both email addresses, as follows:
jsmith67@hotmail.com
jsmith
IMPORTANT NOTE: To stop email from being forwarded, delete the .forward file.
Use Webmail to configure your .forward
Alternatively, you may use Webmail to create a .forward file to forward your EE email to another account. Here are the steps:
STEP 1. Login to Webmail using your EE department login and password.
STEP 2.

Click on "Options" along the top of the browser.
STEP 3.
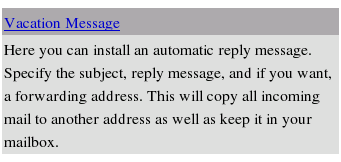
Click on "Vacation Message".
STEP 4.
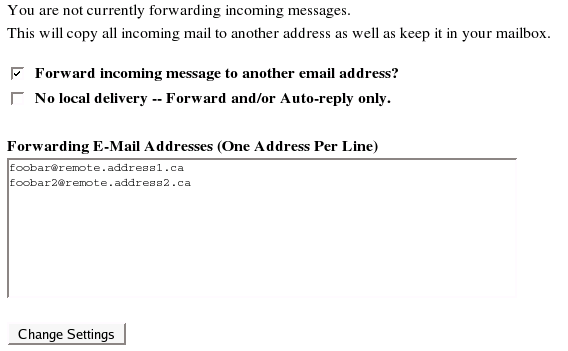
Scroll down until you see "Forwarding E-Mail Addresses".
Check "Forward incoming message to another email address?"
Add your remote email address(es) in the text box.
Click "Change Settings".
A .forward file will have been created in your home directory and any email you receive from this moment on will be forwarded to the email address(es) you entered.
How do I prevent email to my account during the summer break/Internship?
If you are not planning on using your departmental account during the summer months or during the Co-operative Internship Program (CIP) and you do not want email accumulating in your mailbox, use the command:
stopmail
to make you account dormant. All email sent to your account during this time will be discarded. To begin receiving email again, run the command:
startmail
How do I filter out junk mail ?
procmail can be used to filter all incoming mail. You have to setup rules (based on the From:, To: or Subject: headers) to tell it what mail to keep and what mail to discard. To use it:
- Create a .forward file in your home directory, with the
following line:
"|IFS=' '&&exec /usr/local/bin/procmail -f-||exit 75 #USERNAME"
replacing USERNAME with your login ID.
- Create a .procmailrc file in your home directory, with the
filter rules. For example, to ignore all email from the account
annoying@hotmail.com, the rule would be:
:0
* ^From:.*annoying@hotmail.com
Refer to the manual page for procmailex and procmailrc (see section 3.7 for help on using the online help system). For examples of rules that you can then adapt for your own use .
How do I block spam email ?
It is impossible to block ALL spam (unwanted/unsolicited email messages) to a public email address-- it is only possible to block MOST (a large percentage) of the spam. Each account holder on the EE network has the option of enabling or disabling spam filtering for their account. To find out whether the spam filtering feature is enabled for your account, type the following at any xterm prompt:
SpamAssassin status
If the spam filter is enabled it will report:
Spam Assassin is enabled.
Otherwise it will respond:
Spam Assassin is disabled.
To enable the spam filtering feature for your account, type the following at any Terminal prompt:
SpamAssassin start
To disable the spam filtering feature for your account, type the following at any Terminal prompt:
SpamAssassin stop
The spam filter that is installed on the departmental network will validate incoming mail against a number of rules which will determine whether or not the incoming email is spam or not. If the filter believes that the incoming email is spam it will move the mail into your ~/mail/caughtspam folder. This file will contain all incoming email that the filter thinks is spam. This email is collected so you can look through any emails that have been identified as spam and decide whether it is truly spam or whether it's a false positive.
Even though the spam filter attempts to block all spam, some spam will inevitably get through. All the spam emails that were missed should be stored in in a folder called ~/mail/missedspam. The system regularly will adjust your personl rules and adapt itself to block new incoming spam.
Do I have to watch my caughtspam file?
Yes, as long as you've enabled the spam filter the caught spam file will grow in size. Go through this file and delete all spam email messages or it will impact your home-directory storage space.
I've just started spam assassin, why is there spam in my mail folder?
The spam filter only works on incoming email. Thus any email that you already received will not be checked against the spam rules.
I've enabled the spam filter but why am I still getting spam?
First there is no perfect spam filter; the process of blocking spam is quite complicated. Second the system will take 2-3 days to learn and adapt to the type of spam that you receive— please be patient.
Is there anything I can do to help the system learn from missed spam?
Yes you can store any spam that you get into a file called missedspam; simply create the folder called ~/mail/missedspam. Every night the system will attempt to re-adapt its rules based on your missed spam.
APPENDIX
Colophon
This HTML guide was typeset using Emacs 21.4.1 running HTML mode.
Contributors
This guide exists because of contributions made by the following: Cenk Bilgen, Mark Black, Jonathan Chan, Ken Clowes, David A. Curry (choosing secure passwords), John Dear, Luis Fernandes, Daniel Giannitelli, David Magda, Jason Naughton, Rajmund Siwik and Mehmet Zeytinoglu.
If you have any comments about improving future editions of this guide, email them to: <elf@ee.torontomu.ca>.
First Edition
The guide was typeset on a 200MHz Pentium Pro under Linux 2.0.30. The booklet format was generated using psutils tools.
The following CDs were playing during the production: Essential Brazil, various artists; Philips, R.E.M.: Automatic for the People, Green, New Adventures in Hi-Fi; Warner Bros., Masterpieces of Portuguese Polyphony, Lôbo and Magalhães; Hyperion, Graceland, Paul Simon; Warner Bros.
Second & Third Edition
The second edition was produced while listening to various MP3 audio files on a SPARCstation 5/110 running SunOS4.1.4.
Fourth Edition
The fourth edition was remotely edited from a SPARCstation 5/110, on a 6 x 450MHz UltraSPARC Enterprise 3500 with 4Gb of RAM running Solaris 2.6. The booklet format was generated using psnup and dvibook; a Makefile was used to manage dependencies.
The following CDs were playing during the production: Ennio Morricone, The Good, The Bad, The Ugly; EMD/Capitol,Fistful of Dollars; BMG/Razor & Tie, R.E.M., Automatic for the People; Warner Bros., King's Singers English Renaissance, Tallis and Byrd; BMG/RCA Victor, Concerti Grossi, G.F. Handel, Trevor Pinnock and the English Consort; DG/Arkiv.
Fifth Edition
See above for technical details. The following CDs were playing during the production: Natalie Merchant Ophelia; Elektra CD62196, Herb Alpert & The Tijuana Brass, !!Going Places!!; A&M SP4112, Monty Python, The Final Ripoff; EMD/Virgin.
Sixth Edition
Notable CD: Jean Richafort Requiem in memoriam Josquin Desprez, Huelgas Ensemble - Paul van Nevel, Harmonia Mundi.
Seventh Edition
The seventh edition was edited on a 900MHz SunBlade 2000 running Solaris 8 and typeset using the teTeX 2.0.2 distribution. The booklet format was generated using dvibook and the PDF version was generated using dvipdfm. Notable CD: Soundtrack to Amélie by Yann Tiersen. Eclectic music from BBC Radio 3 (http://www.bbc.co.uk/radio3/) on Late Junction and classical music on Through The Night with Susan Sharpe.
Eight Edition
The eight edition (whose release was delayed by a few weeks due to the move to the CCE) was edited on a 2.4GHz P4, running Windows/XP Professional, via an ssh session to a 900MHz SunBlade 2000 running Solaris 8 with GNU Emacs21. It was typeset using the teTeX 2.0.2 distribution. The booklet format was generated using dvibook and the PDF version was generated using dvipdfm. Notable CD: Changing Places, by the Tord Gustavsen Trio, ECM release. The Early Music Show presented variously by Andrew Manze, Lucy Skeeping and Catherine Bott via the BBC Radio 3 audio-stream.
Ninth Edition
The ninth edition was generated, with minor changes, from the eigth edition. Notable CD: French Café, a compilation of French popular music by various musicians (Edith Piaf is noticeably absent).
Tenth Edition
In 2006, the PC workstations were migrated to Fedora Core 5 running the Gnome Desktop thus requiring a complete re-write of this User Guide.
