This journal documents my experiences with a Canon 50D, my first DSLR camera, purchased on Oct. 16, 2008. It is a showcase for my photography, includes comments about the camera's usability, with suggestions for improvement and discusses photography-related topics.
Auto White Balance
technology
Sun Mar 01 00:15:08 2009
I normally shoot with both Auto ISO and Auto White Balance (AWB),
which works correctly 98% of the time. But when the AWB is wrong,
the results are disastrous!
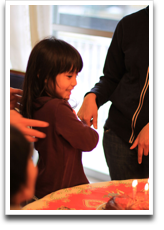
I was shooting a birthday party on Friday and after taking about 6 photos, I glanced down at the LCD and was dismayed. I keep forgetting that the camera doesn't meter the WB properly in my parent's dining room and that I have to manually set the white balance to Tungsten.
 |
 |
The Auto White Balance setting in this light, gives skin tones an orange hue. |
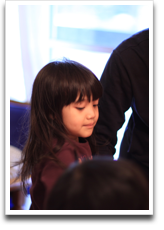
Manually setting the WB to Tungsten, gives correct skin tones. |
I find it faster to correct the orange hues with Leopard's Preview colour editor by sliding the (red/blue) Temperature Slider to maximum blue, the (green/pink) Tint Slider to slightly green and desaturating a bit. I haven't found a quick way to do this in Photoshop Elements. This improves the colours, but it's not optimal.
My S60 had the same problem and I was embarrassed when I took some pictures and had them printed without actually looking at them (at the kiosk, I selected "All photos on the card") and then didn't bother to look at the photos before handing them to my visitng relatives. I was shocked when they looked up from the photos and asked, "Why do we look orange?"
(I switched from the 24-105/4 to the 50/1.4 for this
shoot. Shooting kids who had just eaten chocolate cake, at an
aperture of f/4, is not possible.)
Sun Mar 01 11:12:05 2009: It just occured to me that the
solution, in cases like these, would have been to shoot RAW. Fixing the
white balance in post processing is trivial— it's just a matter
of selecting Tungsten from the drop-down menu.
Sun Mar 01 22:48:10 2009: Photoshop has a built-in to correct for skin-tone. Enhance ->Adjust Color ->Adjust Color for Skin Tone. The dialog has 3 sliders: Temperature, Blush and Tan to further fine-tune the computer-picked skin-tone. The preview is near-instantaneous but the final rendering take about 30s for a 15.1MP image on my Powerbook.

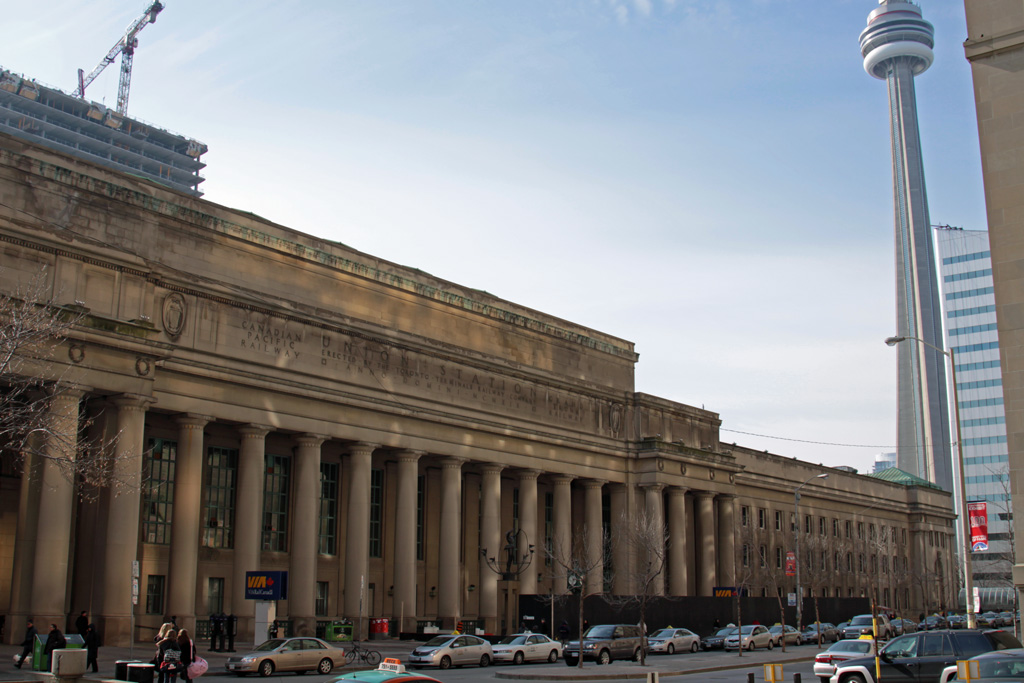
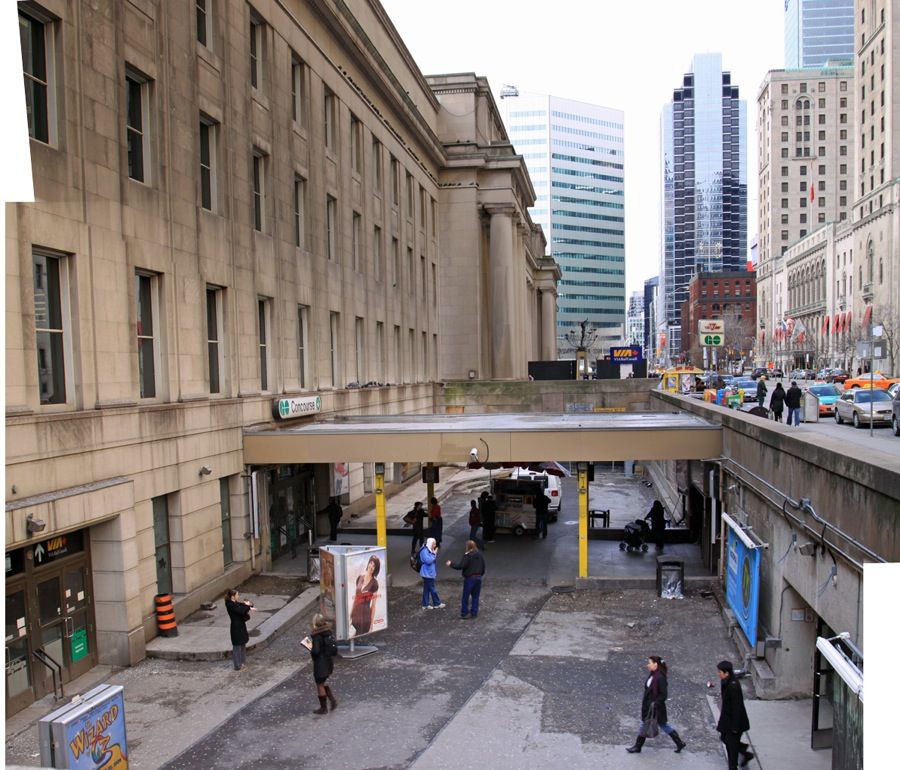
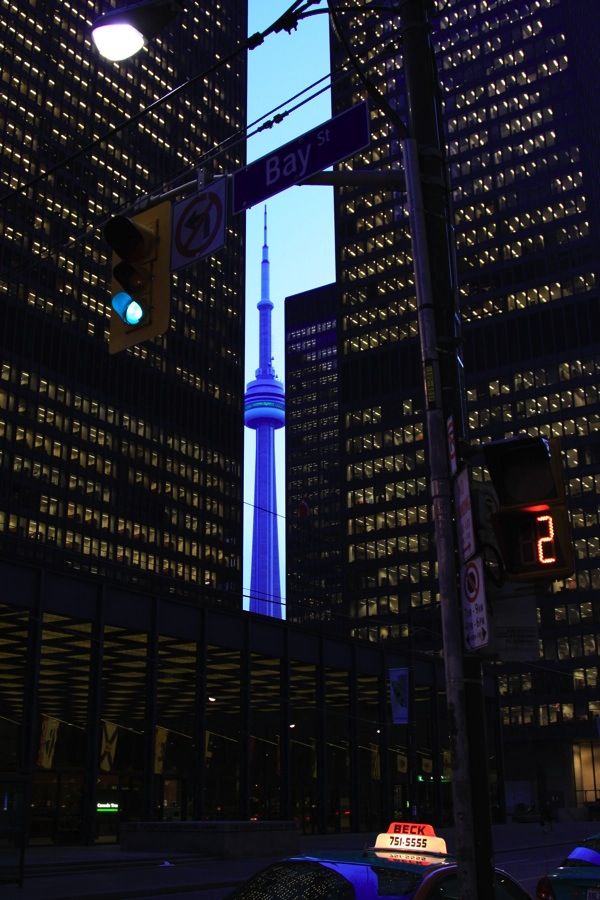
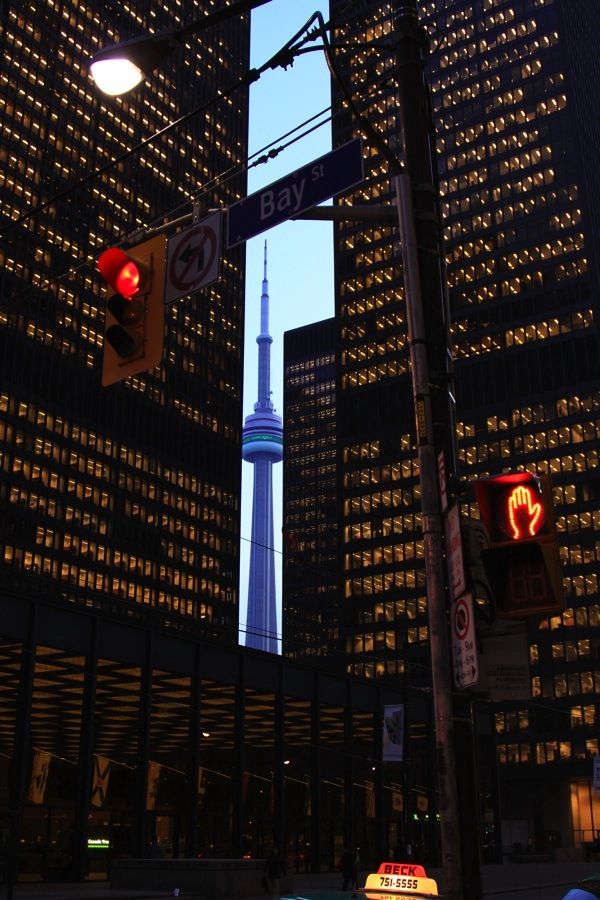
Union Station
Sun Mar 01 11:36:19 2009
 |
 |
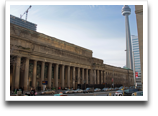
Union Station looking south from beside the
Royal York Hotel. 28mm, f/8 |
Union Station looking west from Bay Street. |
The black hoarding erected along the west side of the station is part of the renovation that will include a shopping plaza built underneath the station. In two years, the hoarding will be moved to the east side and construction will continue.
A large photographic mural, showing the station through the decades since its construction, has since been mounted on the hoarding. Photographs forthcoming.
Afternoon Tea
photo
Mon Mar 02 09:16:07 2009
Take some more tea, the March Hare said to Alice, very earnestly.
Ive had nothing yet, Alice replied in an offended tone: so I
cant take more.
You mean you cant take less, said the Hatter: its very easy to
take more than nothing.
—Alice's Adventures in Wonderland
While discussing movies on ##cinema, the subject of afternoon tea
came up and <brx> wanted a photograph of my tea and biscuits.
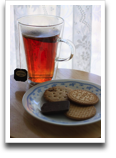 |
Tea (Twinnings English Breakfast Tea) and biscuits (Peek Freans Cranberry Citrus Oat Crunch, Original Maria Tea Biscuit (imported from Spain) and No Frills Chocolate Covered Graham Biscuit). Aperture Priority, 50mm f/1.4 [1 of 15] |
Hours later, looking at the photograph, I realized that I was shooting against the light; the tag on the tea-bag is underexposed. I was rushing through the shoot because my tea was getting cold.
Portfolio: Heimo Schmidt
photographer
Wed Mar 04 18:37:11 2009
Heimo Schmidt (Flash)
has a very unique style in his photography.
Who Shoots the Shooters?
photography
Thu Mar 05 09:22:06 2009
An interview with John Keatly, who photographed Annie Leibowitz.
Canon EF Lens Work III, 8th ed.
book review
Fri Mar 06 22:11:03 2009
Canon's primer on camera lens optics is available
for download
in PDF format (11 chapters).
The beautiful photography of the introductory first chapter, The EF Lens Concept, is equaled only by the marketing hyperbole of the accompanying captions.
The second chapter, Canon's Challenges, begins with the history of Canon:
Kwanon, the Buddhist Goddess of Mercy, was chosen as the
name for the first Japanese 35mm focal plane shutter camera.
Here is the story of how the Kwanon came to be developed
and how it got its name...
Other hilights include the explanation that the "L" lens designation stands for "luxury"; a catalog of Canon's lenses through the history of the company, including the 1961 release of the 50mm f/0.95, reputed to be, "brighter than the human eye". There is also a catalog of all the cameras from 1930 until the 2006 release of the 450D.
Sun Mar 08 09:14:59 2009: The third chapter, The EF Lens World, is an introduction to Canon's prime lenses showcasing each lens (from the 15mm fisheye to the 600mm telephoto) with a sample photograph and technical details about the lens. I found the tilt-shift lens pages more interesting than the rest, especially the explanations on how the lens was used to take the showcase photograph (I wish it had more detail on how the TS lens worked mechanically).
I skipped the subsequent chapters dealing with zoom lenses, EF-S
crop-factor lenses and camera accessories.
I wish I had seen chapter seven, The Basics of Interchangeable Lenses & Correspondence of EF Lenses to Digital Photography when I first bought my DSLR. It is a great introductory chapter to DSLR photography with photographs illustrating field of view of a range of lenses the crop-factor and the concept of aperture. (There are a few minor spelling and grammar errors).
Chapter eight, Photo Techniques, describes the lenses that could be used used to photograp portraits (including soft-focus), macro photography (I am still unclear on the difference between a normal lens and a macro lens), landscapes, underwater photography and wildlife photography.
The final two chapters are extremely technical in nature— chapter nine, EF Lens Technology describes how EF lenses are designed with computer-aided modelling, and chapter ten, Optical Terminology is a comprehensive glossary of terms dealing with optics and photography and MTF charts for all the lenses.
A note on typography: although this book is well layed-out, the typography is appalling; the text is justified; the chosen font is difficult to read with nearly invisible punctuation and the leading is so narrow that I had to backtrack several times because I had skipped a line after getting to the end.
MLU Experiment
photos
Sun Mar 08 20:42:35 2009
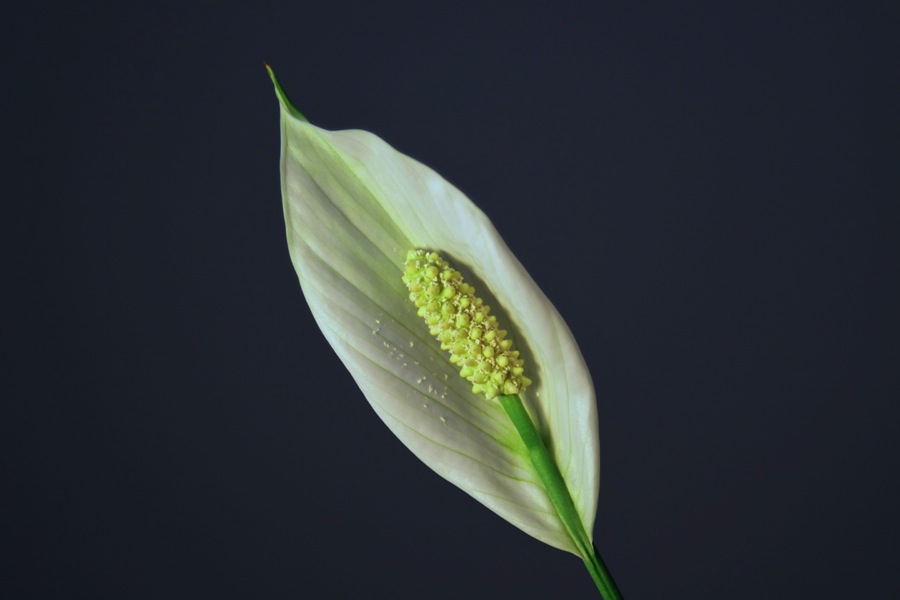
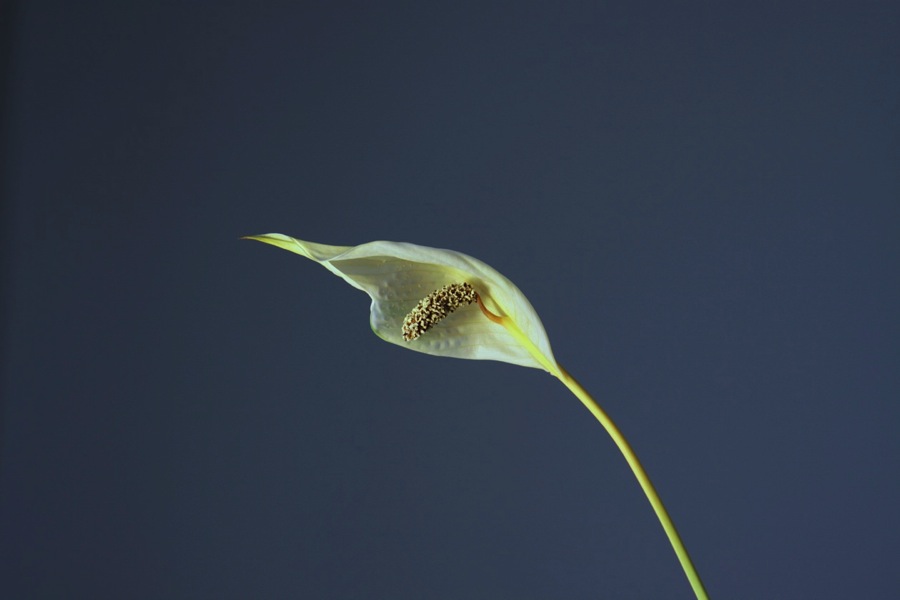
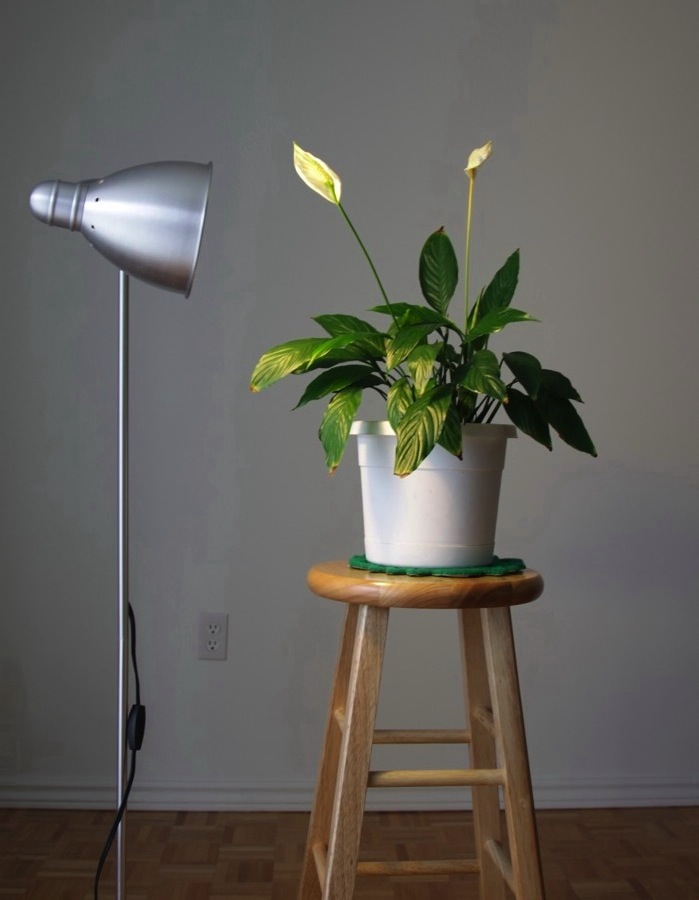
Out of the 31 photos I shot today, over the course of 1 hour and 21 minutes (including "studio" setup time), I got three usable photographs. I was aiming for pixel-peeping sharpness (without a tripod) so I experimented photographing with and without mirror lock-up (MLU) with the camera handheld, and semi-stabilized on a table and on a chair back. I used Live View to manually adjust the focus after the first autofocus.
 |
 |
 |
93mm, 1/50s, f/4, ISO 100, table stabilized |
95mm, 1/6s, f/8, ISO 100, chair-stabilized |
Taken on Feb. 15th, natural indoor sunlight,
1/80s, f/4, ISO 250 |
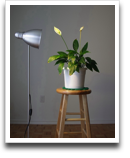 |
BTS; the light is a NOMA CF bulb (which gives
a yellowish light on AWB) on an IKEA stand. |
Even though the Feb. 15th shot is blurry at the edges of the
flower (pixel peeping), I like it the best (even though it has a
slightly higher ISO setting).
From this experiment, I can conclude that using MLU while shooting handheld or semi-stabilized doesn't help pixel-peeping sharpness; a tripod is a definite requirement. I still seek the holy grail of taking an extremely sharp photograph.
I also tried a few shots with the 50/1.4 and I actually got one completely blurry photograph even though I was only a few inches away; with the the 24-105, however, this was never the case— I can see why the L series costs more.
Sun Mar 08 22:27:04 2009: OOPS! I am embarrassed to report that image sabilization (IS) on the 24-105mm was off during the entire shoot. That's likely the why the Feb. 15 photo was better. Sometime in the last week, I probably went to switch from AF to MF by feel and I accidently diabled IS instead (the switch is just below).
Affordable Luxuries
essay
Mon Mar 09 23:23:37 2009
Things that are fun are intrinsically worth
doing; you don't have to justify doing them.
—Alan Kay
Hobbies are, by their very nature, affordable luxuries. They are affordable in the sense that we choose our hobbies based on our discretionary funds; they are luxuries in the sense that we undertake them because we have the leisure time to devote to them. Hobbies are things we don't get paid to enjoy doing; they are things we define as fun, but that tend to cost money.
I consider myself rather fortunate that photography is my affordable luxury. I photograph whatever subjects I want, and whenever I feel like it. These two aspects make photography fun for me. For those that earn a living from photography— the professionals— they are assigned a subject to shoot, and have to be at a certain place at a certain time. There is a lot of pressure to get things right because the opportunity will likely never arise again. This type of situation where you have very little control over what you do, is the cause of stress.
When I first saw Blow Up for the first time, about ten years ago, I fantasized of being a fashion photographer— getting paid shooting runway shows or fashion magazine editorials— beautiful women in beautiful clothes. After the third time watching it, (last year) and now being more aware of the work that goes into lighting a typical scene I changed my mind. After watching Blow Up for the third time and knowing how long setting up the lighting for a shoot actually took, I no longer fantasized of being a fashion photographer— it didn't seem like fun. Not even frolicking with naked models among rolls of seamless paper would convince me that fashion photography would be fun.
Two essays I recently read make the point better than I ever
could. The first is by Peter
McCollough, Lost
At Sea. Have Degree, But No More Photography, where he
laments:
I came to love photography because it offered me not only an avenue for catharsis and a way to interact with people but also a way to share a beauty I otherwise couldnt communicate. Now that I have a degree in photography and Im trying to find a way to support myself with it, and after I have spent so much time and energy thinking and talking about it, photography has become less something I love and more like a large, heavy brick of commerce, structure, industry, expectation and duty that I carry around on my back.
The second is by Douglas Brown, Life With The Riser Crew and the Rule Of The Square, about his experience shooting Toronto Fashion Week while balancing precariously at the edge of the media stage. As far back as last October, after having bought my 50D, I fantasized about photograhing Toronto Fashion Week (which takes place next week), but no more. You couldn't pay me to photograph it.
I am not willing to trade fun for anything. I can be happy just photographing flowers and insects, plants, kids and buildings.
HiFi Panoramas
panorama
Wed Mar 11 09:23:05 2009
Another article by Douglas Brown illustrating some
great panoramic
stitches of several image sequences.
Panoramic photo stitching software is one of the greatest additions to digital photography so it's a surprise it's not used more often. Perhaps photographers don't like the extra step needed to make the panorama, or perhaps they take the principle that, "photography is about leaving things out", too literally.
A new camera, the Sony Cybershot HX1, performs the panorama stitching inside the camera. So now, there's no excuse for not giving the viewer "the whole picture".
Thu Mar 12 18:38:23 2009: David sent along a link to
panoramic photographs from the 1850s in the archives of
the Library
of Congress.
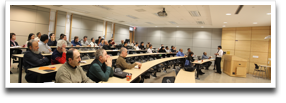 |
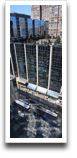
Three-image panoramic photograph of the department council meeting, stitched in Adobe Photoshop Elements 4 [ 5291x1495 pixels (1.7MB). Program Mode, 24-105L @24mm f/4, 1/25s, ISO 400, +1/3 EV, AWB. ] |
I brought my camera in today and I photographed the departmental council meeting. I created a three-image panorama from one set of photos which turned out quite well, considering I forgot to lock the exposure while shooting.
Update Sat Mar 14 14:51:13 2009:The making
of a 34,800x8,000 pixel Antarctic landscape panorama.
Tom Hanson, R.I.P.
photographer
Sat Mar 14 12:06:03 2009
Tom
Hanson, Canadian Press photographer, collapsed and died after
playing hockey. He was 41.
In 2001,
his photograph
of a bagpiper playing the pipes, while wearing a tear-gas mask at a
protest, won Picture of the Year.
A gallery
(Flash required) of his photographs.
"My Menu" Settings
settings
Sat Mar 14 15:04:58 2009
These are the contents of My Menu (a customizable menu)
on my camera:
- Quality: I sometimes shoot 8MP photos when doing panoramas, so I need to quickly switch from L to S quality images. [Used Sometimes]
- Select Folder: since I create a new folder every week (creating one every month still produced too many photos, in a single folder, to manage easily) I need to tell the camera to use the new folder. [Used Weekly]
- Hilight Alert: I used to like to see blown hilights blink, but now I find I rarely get blown hilights, so perhaps I will replace this item with something else). I would toggle the blinking off before showing people the photos because they would inevitably ask why the photo was blinking. [Used Rarely]
- Mirror Lockup: this item was Live View Function Settings until last week, when it was replaced because I never used it. [Used Rarely]
- Slideshow: I though this would be useful to have, but I haven't used it yet. [Never Used]
- Set Date/Time: I have to use this twice a year for DST and also
because I don't wear a watch. [Used Often]
The one complaint I have about My Menu is that you can only have one screenful of entries (six in total). I wish it would allow for more, and allow you to scroll by screenfuls. I discovered this limitation when I went to add Mirror Lockup to the menu and the camera complained that I had to delete one of the items because the Menu was full.
Update Sat Mar 14 19:04:06 2009: A feature request I would like to suggest to Canon is that every time a menu item is changed from the default factory settings, it sould be automatically added to the end of My Menu so like this I know everything I've changed without making external notes.
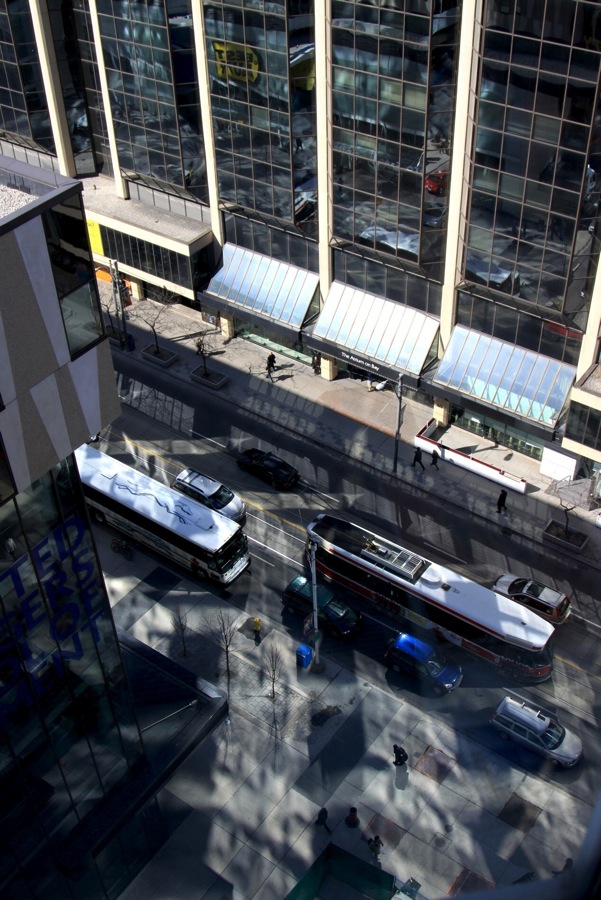
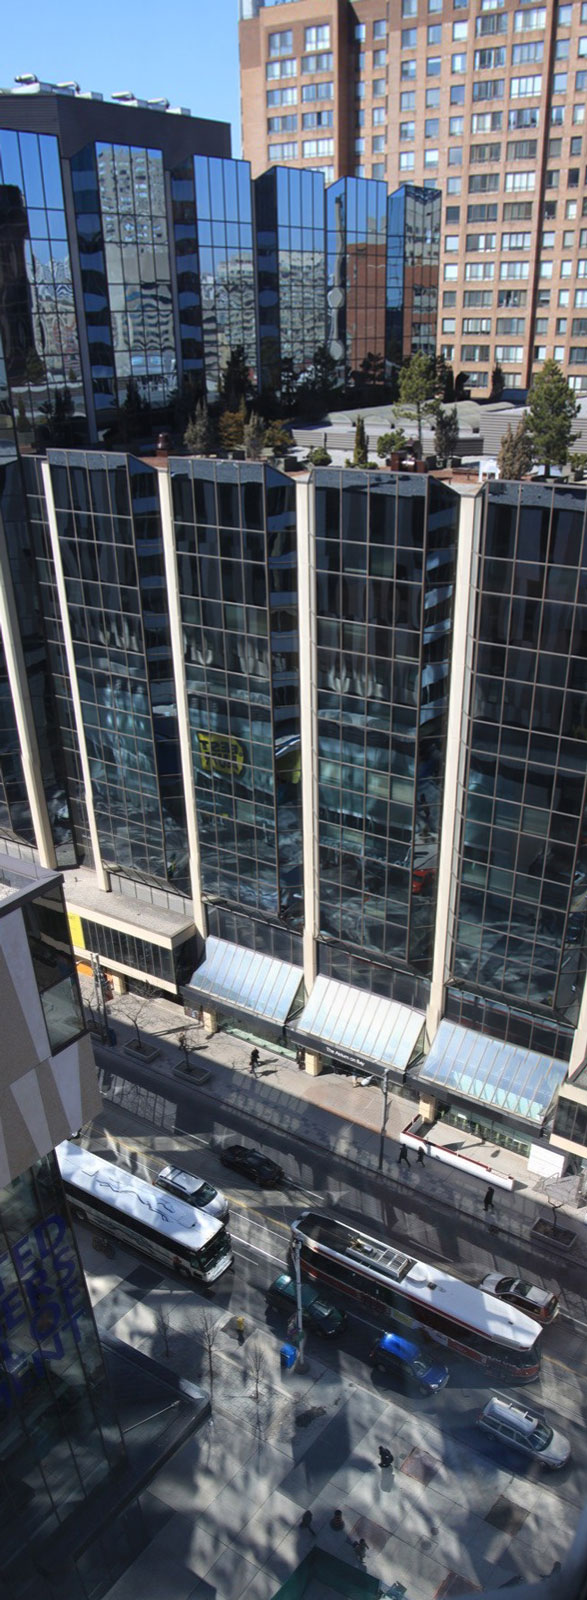
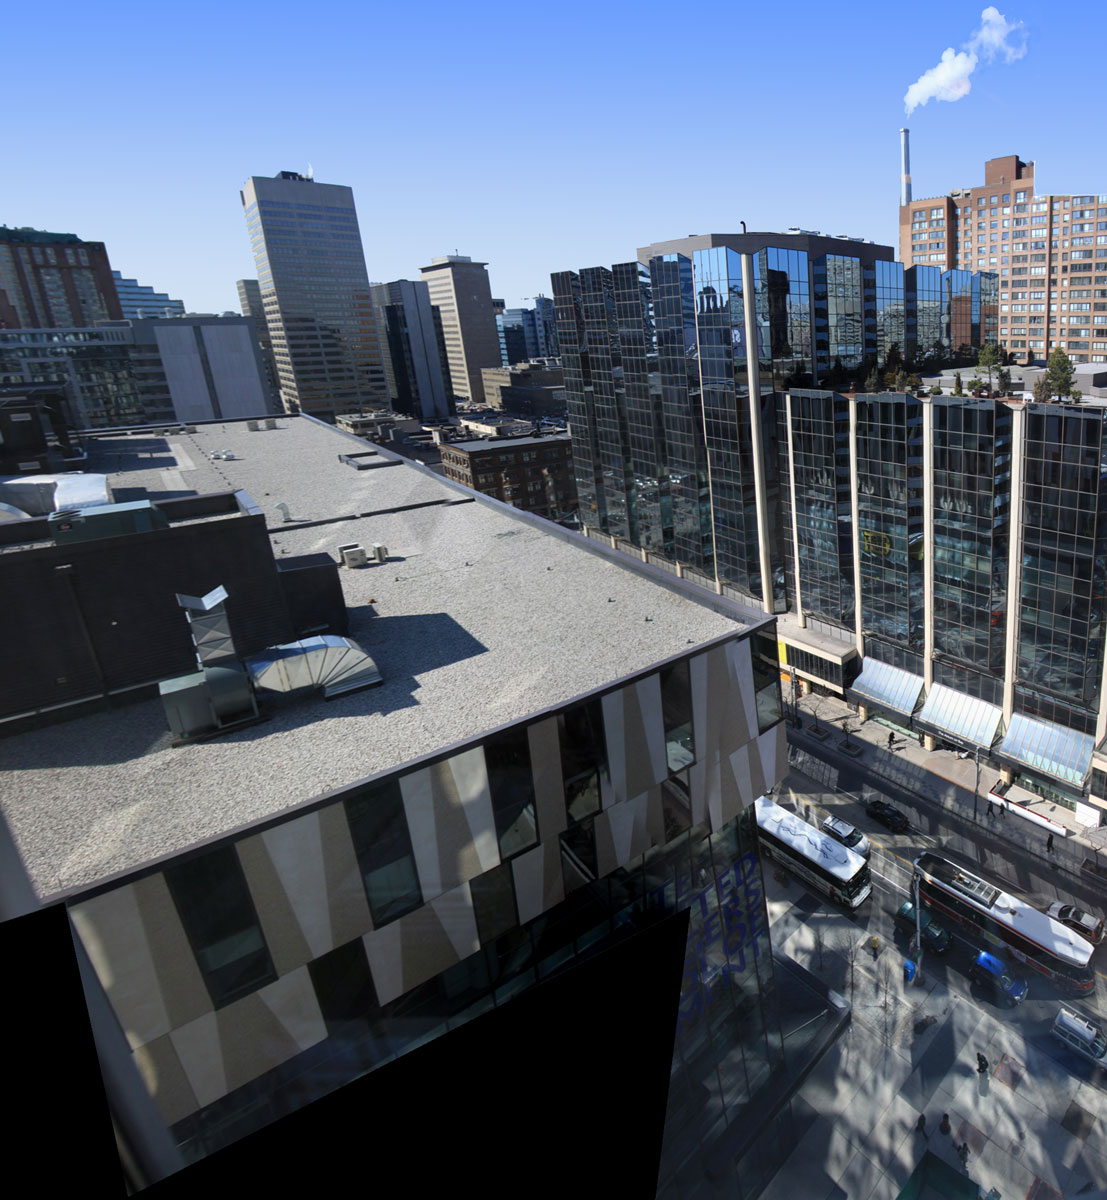
Looking Down
photos panorama
Sun Mar 15 09:53:29 2009
I took my camera and went to visit a friend I hadn't seen in many years. I originally stitched a single-strip, three-image, vertical pano, but I felt it didn't give a true picture of the view so I tried a five-image pano, though I knew I hadn't taken enough photos to get complete coverage.
 |
 |
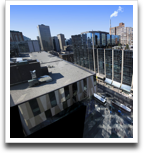 |
Looking down from 1 Dundas St. onto The Atrium on Bay at Yonge and Dundas St. This photo stands by itself quite nicely. [1 of 5] |
I prefer this two-photo pano because it shows the complete building, including the rooftop garden. |
This is a five-image pano. The sky was filled-in with a gradient fill to eliminate the ugly stitches and missing sections were filled with black. |
I waited until a streetcar drove by, before photographing the street because the photograph taken earlier, without the streetcar, looked like it was an ordinary downtown street in any city.
I noticed that the single photo looks good in B&W because I have the full range of shades from brightest white to deepest black; the shimmering shadows on the sidewalk make it even more interesting.
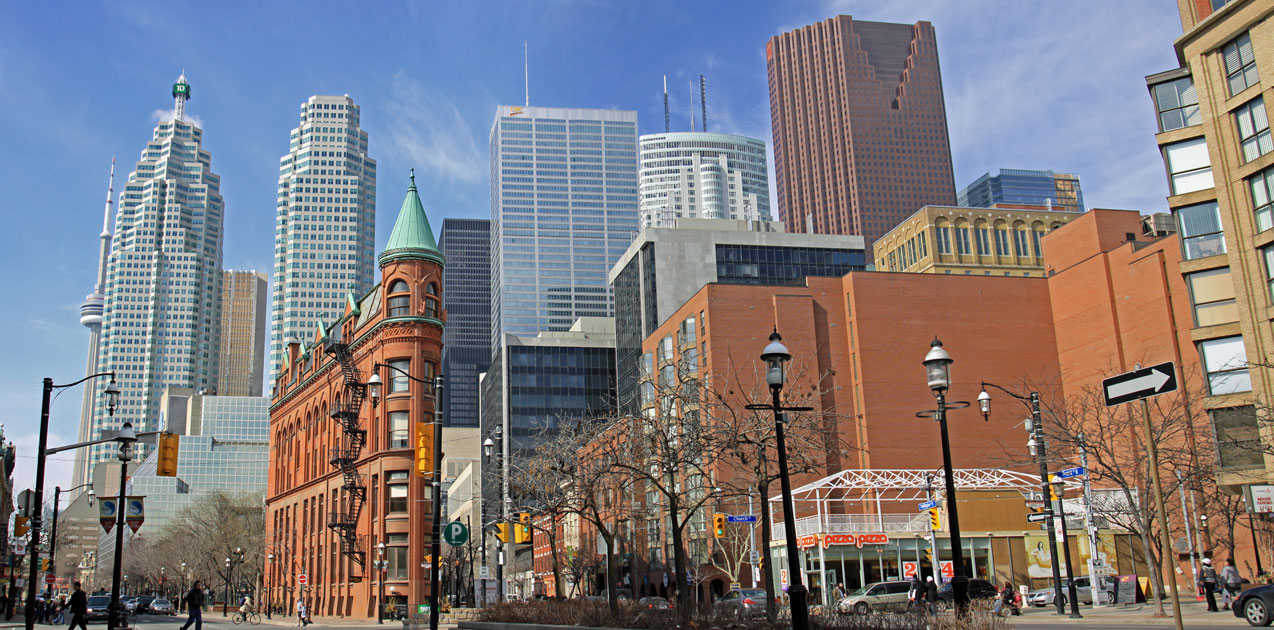
Around Front Street
photos
Mon Mar 16 22:01:15 2009
First day of March Break meant lots of kids on the train. But the
beautiful, sunny day, with a cool breeze made up for the noisy
crowds.
I packed my camera with me and was quite productive. I decided to
shoot using the Landscape filter setting. I found that though the
colours are more vibrant, the orange of the brick in the Flatiron
and adjacent building was unrealistically saturated and I
de-saturated it in post-processing.
 |
 |
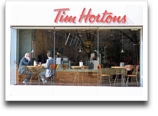
The exterior of the store is overexposed, but
it was a trade-off to keep the interior detail visible. [Cropped] |
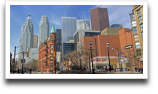
Two-image pano of the Flatiron building and
surrounding towers. I made sure the CN Tower was also in the shot. |
Did you spot the photographer?
Compare the Flatiron pano with a photograph from the 1890s. Aside: In the basement of the Flatiron building is a pub called the Flat Iron and Firkin; the blackboards with witty sayings, placed at the entrance, are always amusing. Some of the waitresses are quite lovely, too; last year there was one that reminded me of Audrey Hepburn or Winona Ryder (I couldn't decide). If she's there this year, I will photograph her.
No Photos Allowed On GO Transit Trains or Property
policy
Thu Mar 19 12:50:56 2009
I was happily taking photos on the GO train inbound to Toronto today, when I was tapped on the shoulder by a GO Transit Ticket Enforcement Officer and told that what I was doing was not permitted due to security reasons. I offered to delete my photos but he said that it wasn't necessary and he wasn't going to fine me.
After I got in to work I called the GO Transit Facilites Services at 416.869.3600 ext 5115 and spoke to a nice lady who confirmed what the officer told me. I wasn't allowed to take photographs (even for non-commercial purposes) and post them pubically (e.g. my personal website); especially if those photographs displayed the GO Transit logo. (The photo permit for photographing for commercial purposes costs $1000.)
While on the phone with her, I did a search for "go transit" on flickr.com and noted that there were about 7,000 photos of GO Trains and stations. I asked her if she would be requesting that those photographs be taken down; she said she would look at them later. I also mentioned that the GO Transit website does not mention this policy and she said that this was a good point and she would bring it to the attention of her supervisor.
Update Thu Mar 19 17:03:49 2009: Coincidentally, Amtrack has released new guidelines using all the recommendations from the NPPA (National Press Photographers Association), after an incident where a photographer was man-handled for photographing on Amtrack property, for an Amtrack-sponsored photo contest.
Update Sat Mar 21 09:52:14 2009: I received a reply from GO
Transit regarding the matter. The regulation about photography is
mentioned on their website:
For rules and conditions for travel on GO Transit property please visit our homepage www.gotransit.com and select About GO, then Rules and Regulations, then GO Transit's Passenger Tariff:
Listed under Rights Reserved, Page A-24
28.15
No person shall operate for commercial purposes any camera, video recording device, movie camera or any similar device upon the transit system without the express written permission of GO Transit.
The email further says that personal photographs are allowed but that anything of a suspicious nature may draw the attention of the Enforcement officer. My comments were forwarded to the Enforcement department for review.
Update Sun Mar 22 00:25:11 2009: Jim emailed me the TTC
photography policy:
Tourists, families and individuals filming or photographing within the public areas of the transit system for non-commercial purposes, are not expected to contact the TTC to obtain permission or a permit so long as such filming/photographing does not interfere with the safe and orderly operation of the transit system and/or our customers.
Golden Hour
technique low-light
Fri Mar 20 08:16:00 2009
This past week, on clear days, I have been experimenting with
photographing during the Golden Hour as I leave work about a half
hour before the sun sets.
On one day I set the camera to f/4 and (Evaluative) Partial metering and on the second day I set it to f/8 with center-weighted average and re-took the same photographs, which included both bright areas (sky) and dark areas (buildings), to see how well the camera would meter the scene and balance the extremes. (In hindsight, I should have also shot in full-auto mode to see what the camera does).
I am still comparing the f/4 and f/8 photographs there's a few days worth of analysis before I can make any conclusions (though a cursory glance, last night, showed no noticeable difference between the two techniques. I'm still missing something.
I found that the AWB reproduced the colour accurately for the most part, but a few times, setting the WB to Cloudy produced the correct colours. When photographing buildings against the sky, the camera used ISO 200-250 and the photos look great. In photographs which have no visible sky (down in the canyon, so to speak), the camera compensated with ISO 1600 which gave the photographs, though exposed well, a "muddy" look that lacked sharpness/detail. The camera(*) also tended to over-expose by one f-stop when shooting an uniformly coloured area (the shadow side of Massey Hall and the Winter Garden theater on Victoria) regardless of the metering selected (*I suppose it's the image-stabilized lens that contributes to this).
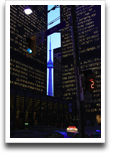 |
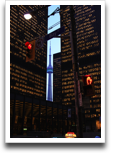 |
AWB setting looks more blue than it should be (notice the faded colour of the pedestrian traffic light). 28-105L @28, f/4, 1/50s, Partial metering, ISO 500, -1/3 EV. |
Cloudy WB setting gives an accurate colour representation; the green "decorative lights" on the tower are more evident. 28-105L @28, f/4, 1/40s, Partial metering, ISO 500, -1/3 EV. |
The Toronto-Dominion Center was designed by Mies van der Rohe in 1967 and looks completely modern even today. |
Earlier, I had written that I was using Evaluative metering, when, after checking the EXIF, I was actually using Partial metering (covering 9% of the center of the viewfinder) which might explain why AWB was more blue than it should have been. Though, I'm not sure if the WB calculation is dependent on the metering.
I wasn't able to duplicate this shot at f/8 and center-weighted average metering because the pixelboard on the corner pillar, next to where I stood to take those photographs, was being replaced and that area was cordoned off (I have photos of that).
David emailed with a good question: Wouldn't it be better to change only one variable at a time?
If I was using the scientific approach to photography, I would be obligated to change only one variable at a time and observe its effect. However, given the number of settings this camera has, I would never complete the experiment if I followed the scientific approach. On the other hand, I have found that the artistic approach to photography gives more interesting results when "calculated randomness" is involved— "what happens if I press this button?"— leaving a little bit to chance.
I have also found that an accidental setting will give bad results 99% of the time, but I tend to learn a lot better from my mistakes and the results of that remaining 1% where it all worked out completely by accident, are just awesome.
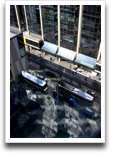
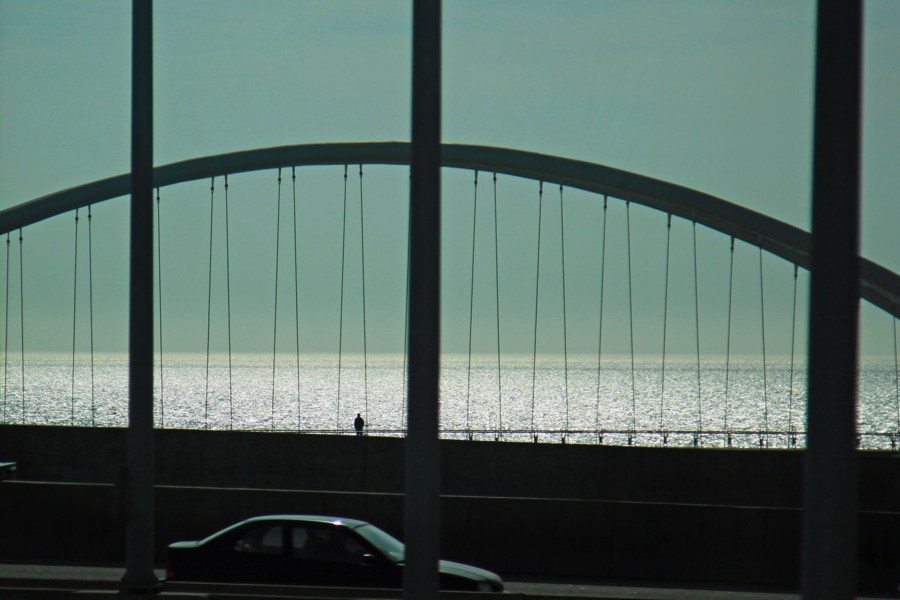
Humber River Bridge
photos
Sat Mar 21 11:03:22 2009
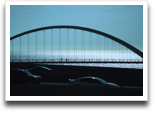
This pair of photographs is from a 14-photo sequence shot in low-speed continuous drive as the train travelled across the mouth of the Humber River along the Lakeshore. I started shooting in the shade of the condominiums and it took 4 exposures before the camera adjusted from shade to bright sunlight and re-metered.
 |
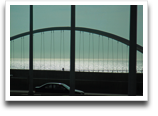 |
Pedestrians on the Humber River Bridge and traffic on the Gardiner Expressway in the foreground, shot from the GO Train. 24-105L @92mm, f/4, 1/1250s, ISO 100, AWB. Smart Fixed in Photoshop Elements (first photo manually fixed in Preview), cropped and straightened. [2 of 14] |
The photographs are interesting because of the people on the bridge give it scale. The photos also work nicely as B&W. The Smart Fix removed a bit of the green tint from the train windows, but I think it could use some more adjustment. Update Sun Mar 22 12:12:43 2009: I manually fixed one of the images in Preview by boosting the blue-channel and adding a touch of red. I don't know what the colours actually looked like, as I have only see the bridge from inside the train.
Jay Maisel on Photography
advice
Sun Mar 22 14:53:33 2009
Jay Maisel tells
several anecdotes,
on the subject of photography, which I found very instructive.
Don't forget to
visit George
Steinmetz's site for an atypical view of the African continent.
Gianni Giansanti, R.I.P.
photographer
Mon Mar 23 09:14:50 2009
Gianni
Giansanti, "The Pope's Photographer", died of bone cancer,
March 19th, aged 52.
Aside: I was a bit surprised to read, in the Time article, that
Pope John Paul II was credited in ending the Cold War.
Tue Mar 24 12:22:33 2009: David emailed me an explanation,
which I excerpted below:
In his own words: "I didn't cause this to happen," John Paul was later to
say. "The tree was already rotten. I just gave it a good shake."
In general the credit for the the fall of Communism were his links to Poland and the Solidarity trade union (led by Lech Walesa). Walesa once remarked (paraphrasing): "If I organize a meeting, ten people show up. If the Pope organizes a meeting, ten million show up."; which they did. On his first to Poland after being elected Pope, there was a mass held with an estimated attendance of 10M— about a third of the population of Poland.
Not surprisingly, the CIA was involved.
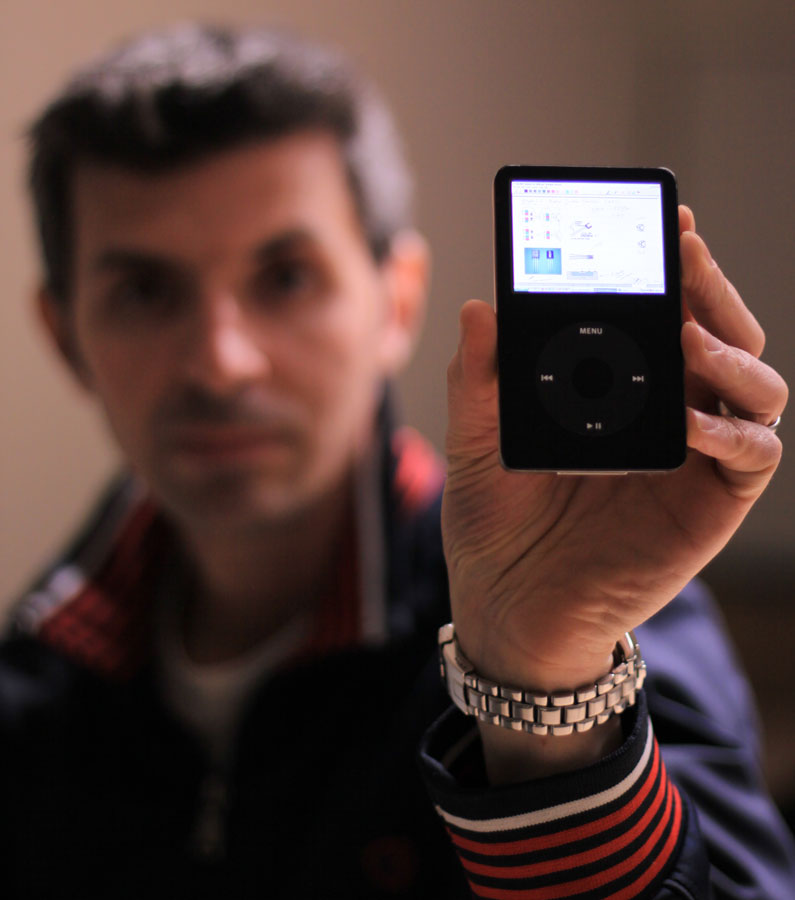
Photo Session
photographs
Tue Mar 24 15:38:48 2009
I had a photo session yesterday, with a faculty member in the
department, for an article. I wanted the person's face slightly
blurry but recognizable and the iPod, sharp in the foreground.
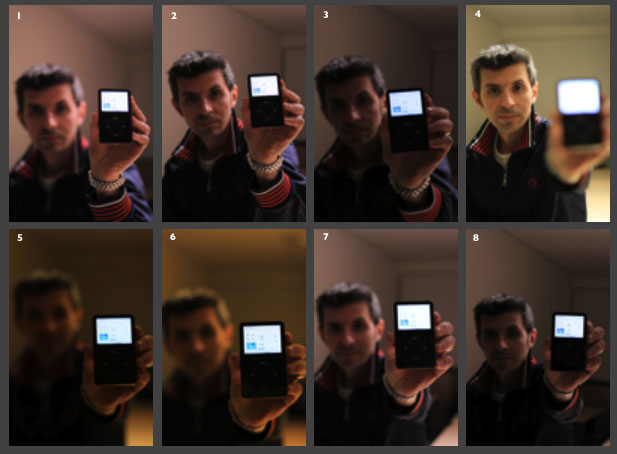 |
Contact sheet for the photos. 50mm f/1.4, Auto-ISO and Auto-AWB (yellowish photos) then Fluorescent, Aperture Priority with apertures ranging from f/1.4 – f/5.6. [8 of 8] |
There was a shot similar to this (but with a Blackberry; it think the photographer was Kevin van Passen who does the best-lit Valentine's Day layouts) in the Globe and Mail, a few weeks back, but I had this composition in mind much before that— I don't remember where I got the idea.
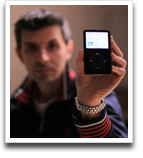 |
The chosen photograph (No. 1). 50mm f/1.4, 1/60s, ISO 125. Cropped. [1 of 8] |
No. 1 (taken last) looks the best in terms of lack of noise; No. 6 also looks good (but needs a white-balance adjustment). Total time for this shoot, 5 minutes. No. 4 (taken first) was a "safety" with the person in focus. In hindsight, I should have also taken a safety at f/8.
Notes on the Shoot
Tue Mar 24 23:16:52 2009: Before the shoot began I explained to him how I wanted him to pose. He then guessed my depth-of-field intention— that I wanted the background blurred. I found that it also helped when I showed him what each resulting photo looked like, as I took them.
Later, looking at the contact sheet, I realized why the exposures are all so different— I forgot to lock exposure!!! I was shooting using the focus-and-recompose technique where after the initial focus on the iPod, using only the center focus point, I recomposed the shot. I could have switched to one of the other focus points that rested on the iPod, if the camera was mounted on a tripod.
The second thing I forgot was that I could change the aperture using the top scrollwheel; I kept using the rear LCD and the rear wheel. It would seem that in the five months of using this camera, I'm still not accustomed to the interface.
(Aside: for some damnable reason, the Quicklook slideshow never shows the selected photographs in the correct order (as displayed in the Finder, sorted by date); they are shown in random order! The contact sheet above was generated by using the Index generator in Quicklook, which is why the photos don't appear in the order they were photographed.)
In the contact sheet, the photographs where the subject is blurrier than usual, were taken at the start. He started out by holding the iPod with his arm fully extended. I tried compensating for this by changing the aperture I jumped from 1.4 to 4, then 5.6 (with the scrollwheel, I could have increased the aperture value after each photograph). After I realized that this wasn't giving me the shot I wanted, I asked him to bend his arm a bit and then move it sideways until the iPod was "next" to his face. So I was able to shoot at f/1.4 and still keep his face blurry but recognizable.
I have to say I am impressed that I got the shot I wanted, after only eight photographs. As of last year, my keep/discard ratio was 1:20, so this is certainly an improvement. In this kind of photography (posed) it definitely helps to envision the shot you want before you begin, otherwise you're fighting with both composition and with the camera settings.
Canon Rebel T1i
hardware
Wed Mar 25 09:17:28 2009
Canon has announced a
new Rebel
T1i (500D) with 15.1MP and HD video. The rear controls look
overly complex.
Canon 5D Mk II Field Report
review
Thu Mar 26 21:56:28 2009
Nick Devlin reports on the Canon 5D Mk II he used during the
Antarctica 2009 photo expedition.
(I love his comment about lack of photographers on Canon's camera
design team. It echoes my comment, regarding the issue with the
extra button press required before zooming into a photo, right
after taking it.)
I would also have to agree with his conclusions— I don't
love my 50D (it's a great camera), but I do love the 24-105mm and
the 50mm when it focuses properly.
Camera Bag Reconfiguration
technique
Sat Mar 28 11:06:59 2009
I reconfigured my camera bag after buying the 24-105mm lens because the configuration I was using, wouldn't allow any space for the 50mm lens. I had also begun using the battery grip, which I would definitely recommend if you have a heavy lens like the 24-105 or the 24-70, because it adds balance to the camera and eliminates wrist contortions when shooting in portrait mode.
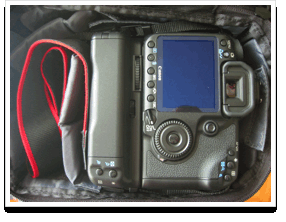 |
The camera lies lens-down in
the new configuration. Both the battery compartment and the CF
card compartment are accessible without removing the camera from
the bag. |
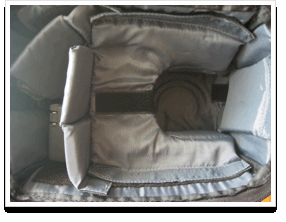 |
Inside the bag. The 50mm is stored (in the
original plastic bag, wrapped in bubble-wrap) vertically in the
top-left corner and the charger in the bottom left. |
If you look closely at the second photo you will notice that the lens-cap impression at the bottom of the bag is not a full circle. This is because the hand-grip on the camera rests on the horizontal flap and raises the right had side of the camera upwards giving two benefits— the LCD on the left doesn't brush against the bag cover when it's closed and the CF card access cover is closer to the top of the bag, making it easier to remove the card from the camera while it's still in the bag.
There are also two dessicant packets in the bottom of the bag; one in the left side and one in the right side.
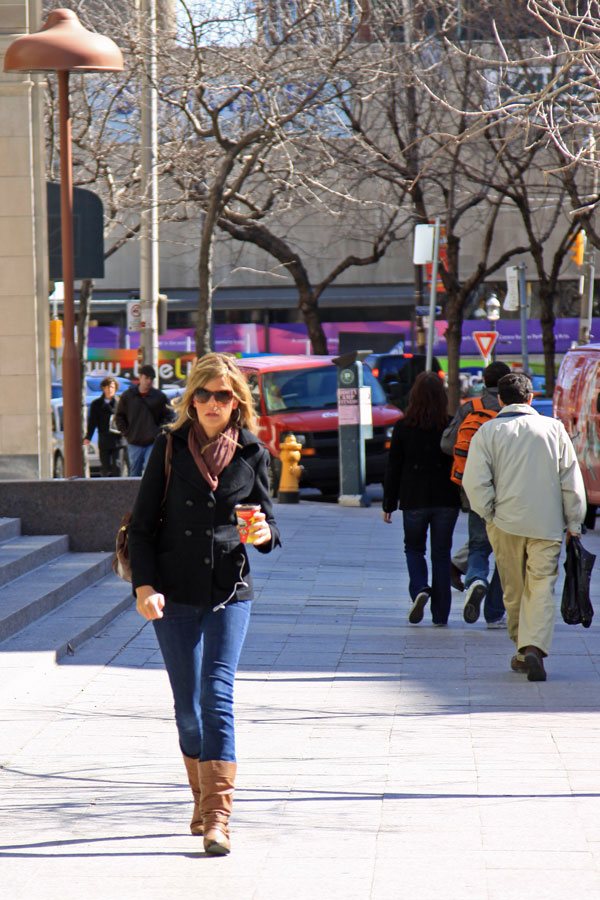
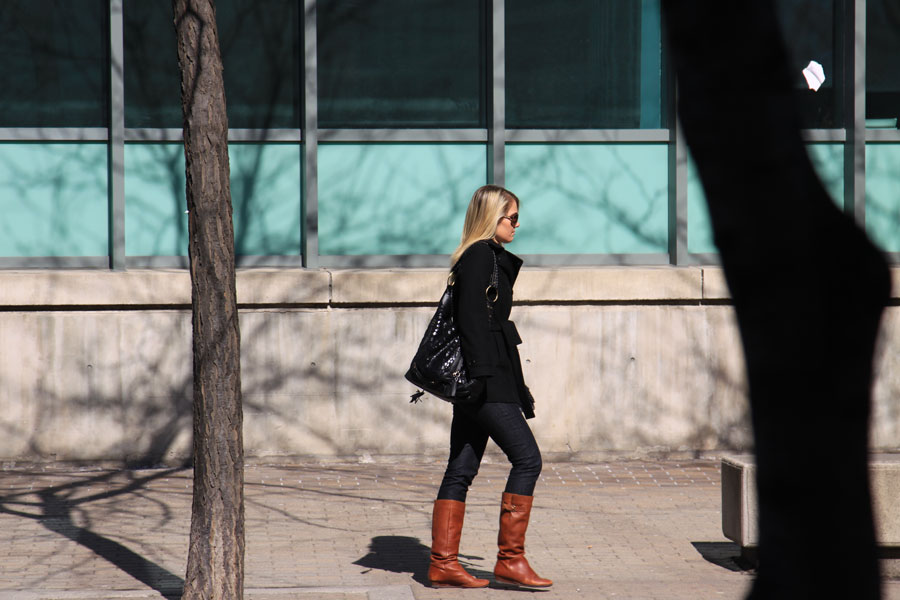
Toronto Spring Fashion Trends 2009
Sat Mar 28 14:53:08 2009
This collection of photos is from the last couple of weeks. The trend seems to be a short jacket, tight jeans and leather boots.
Photo 1 is blurry because the subject was approaching the camera which wasn't set to track focus in AI Servo mode. All were taken at 105mm, photos 2 and 3 were taken from across the street. Photos 1 and 3 are cropped.
"Mirror Box": My blog on Blogger.com
Sat Mar 28 21:53:23 2009
I have created a blog on blogger.com
called Mirror Box. My
first post there is a copy of my camera review— I wanted to
see what the interface was like.
I will continue posting here until I copy all my old posts over to
blogger.
Helen Levitt, R.I.P
photographer
Mon Mar 30 12:14:11 2009
Helen Levitt, died in her sleep yesterday; she was
95. A slideshow
of her famous street photographs.
Life.com Photographs
photos
Tue Mar 31 12:18:32 2009
Life.com now has a decent
interface to all those photographs scanned and hosted by Google.
The RSS feeds seem to be broken.


