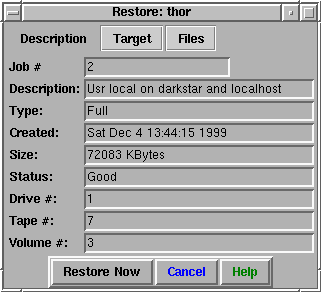
What is MAT

Main Page

Reducing Administrative Cost

Managing Servers

See MATtool in Action

Download

Contact

Backup and Restore Module

MATtool includes a tape backup and restore module.  With it you can easily backup you UNIX machines.  It many of the features of commercial backup products, including teh ability to backup many hosts at the same time, and online catalogs.  MAT can use your SCSI tape drive to backup the files on all the hosts where the MAT agent is installed.  The following gives a more in depth explanation of the backup and restore user interface. A Quick start guide explains how to quickly setup MAT to backup.  Please note this module is still a beta version. It cannot deal with end of tape (EOT).

  Backup
This icon gives the administrator access to the backup system.  From a single tape server every UNIX MAT client can be backed-up.  The following details the function of the backup icons:
 

Backup Devices
From this icon you define the tape devices which are available for MAT to backup to.  Selecting it gives a list of the devices configured on the host.  If none are defined, they can be added by hitting the New button.  The tape GUI will be displayed.  It will ask for:
ID #  - This is just a number which MAT will use internally to represent the tape device.  Anything from 0-255 is valid, but it should not match any other tape device on the tape server.

Name: - This a descriptive string you can use for identifing the tape devices.

Path: - This is the path for the tape device.  The non-rewinding device must be used.  It may look like one of the following:   /dev/nst0   - Linux
                            /dev/rmt/0hn   - Solaris
If the tape device supports multiple densities, you should use the highest density.

Picker Path:  - This field is not used in the current release of MAT.  It is for the path of the SCSI library device.  If you don't have a jukebox just set it to /dev/null.

Number of slots:  - This field is not used in the current release.  In later releases this will be used to tell MAT how many slots are in the Jukebox.  Set it to 1 for tape-drives.

  Backup Group
The backup group defines a group of hosts for a backup job.  Backups are performed on groups of hosts.  A backup group should have atleast one member.  Double-clicking on this icon displays all the groups on the tape server.  To define a new group of hosts hit the New button.  The resulting GUI will ask for:
GID #  - This is a numeric value representing the group of hosts.  Use anything from 0 - 65535.  Take care not to use the number used by another group.

Group:  - This is a decsriptive name for the group.

Member Hosts  - This section is used to list all the hosts in a backup group.  A backup job will consult this list and start backups on all the hosts in this list.   The list should have atleast one member, and no more than 64.
 

  Backup Job
From this icon the backup jobs are defined.  Selecting this gives a list of the backup jobs.  To create a new job just hit the New button.  The resulting GUI will prompt for:
Job # - This is just a numeric value MAT uses to identiy jobs.  It can be anything from 0 to 65535.  It must be unique.

Description: - This is a string describing the backup job.

Backup Group: - This selects the hosts to be included in the backup.  The actual group members are edited by the Backup Group GUI.  Hit the ... button for the GID of the groups defined on the tape drive.

Backup Device: - This is the name of the SCSI backup device to write to.  Use the ... button to see the devices which are configured on the tape server.

Retention: - This is the number of weeks to keep a backup before it has expired.  Each backup has a time stamp.  After the retention period has elapsed, the volume can be overwritten.  Once all volumes on the tape have expired the tape can be reused.

Backup Pool: - This is not used in this release.  It can be set to 0.

Browse Host: - The GUI allows you to look through the directories of any of the hosts in the backup pool to select the filesystems you want to include in the backup set.  You can select up to 128 items to backup.  Directories such as /, or /usr count as 1 item eventhough their contents are included in the backup.  On the left listbox will be displayed the contents of the current directory on the current host.  To change directories just double-click on it.  To include it in the backup job Right-click on it, or select it and hit Add.  Note changes to the backup request list are applied to the tape server immediately.

  Media Management
The media management icon will display the contents of all the MAT tapes.  It is also used to label a tape so MAT can use it.  To add a new tape for MAT to use hit the New button.  The resulting GUI will prompt for:
Name:  - This is a string containing a descriptive name for the tape.

Backup Pool#: - This is for later use.  Later tape pools will be used to distinguise backup sets.  Just put in 0.

Backup Device:  - Select the device to use for the backup.  Note you must have defined the tape devices before you try to label a tape.  Hit the ... button for a list of all the devices and select one.

Raw Capacity (KB): - This is the uncompressed tape and tape drive capacity.  Hit the ... for a list of some common capacities, or just type it in.

When labeling a tape, the tape must be in the drive.  Labeling the tape will write a small header on the tape.  The header is used by the backup and restore functions to identify the tape.
 

  Backup Schedule
This will be for defining when the backup jobs run.  Currently it will bring you to the MATd screen.  The MATd daemon can be configured to run backups.  Hit the New button.  In the job type set it to Backup, then select the backup job you want to run.
 

  Restore
This icon gives the administrator access to the restore user interface.  It will display all the hosts which the tape server has been used to backup.  What follows is a description of how to restore.
 
Restore Host
Every host which the tape server has backed-up will create a restore host icon.  Double-clicking on the host will display a list of all the backup sets for this particular host.  It will display the type, size, creation date, and description.  Double-clicking on the host will start the restore GUI as depicted below:

It displays more detailed information about the backup status.  Clicking on the Target tab will display the following UI:

From this view the location to, and how to restore files is set.  It is possible to restore to another host by putting in the alternate hosts name in the host entry.  To restore to an alternate directory change the location.  During the restore it may be that some of the files/directories to restore already exist.  One of the four options must be set.  Clicking on the Files tab will display the file selection screen:

Select the files and directories to restore.  Right-click, or hit the add button to add the file to the restore list.  The restore list is limited to 128 files and directories at one time.

After selecting the files to restore, where to restore to, and how to deal with duplicates, press the Restore Now button to start the restore.  Note the correct tape has to be loaded into the tape drive.